MacTalk
February 2022

Network Time Machine Backups: Moving on from the Time Capsule
Since its introduction in Mac OS X 10.5 Leopard, Apple’s Time Machine has become one of the Mac’s most essential features, providing transparent, fully automatic, full-machine backup to an external drive, with retention of backup history limited only by the external drive’s capacity.
For desktop Macs, it’s easy to keep an external Time Machine drive permanently connected. But, speaking from my experience as a consultant, I find that the vast majority of laptop users, myself included, are unlikely to plug in a drive regularly. (If you have to remember to connect a drive for backup, the backup system is no longer fully automatic.)
Apple answered the need for ongoing wireless laptop backups in 2008 with its AirPort Time Capsule, a Wi-Fi router with a hard drive inside. In other words, it was a Network Attached Storage (NAS) device, though Apple never described it as such. The Time Capsule acted as a destination for automatic, hourly Time Machine backups from Mac computers on the same network. As an unusual hybrid, Time Capsule did not earn the confidence of some Mac users as a reliable backup device. I have seen it fail occasionally, though it saves users’ data much more often than not. Unfortunately, when Apple discontinued its AirPort line of home networking products in 2018, the Time Capsule was one of the casualties.
A potential alternative is a cloud backup service such as Backblaze, which I frequently recommend, and such a service works even when the laptop is not on your home network. However, I see cloud backup as a complement to Time Machine, not a replacement for it. It is less comprehensive and requires considerably more work to restore from, especially if you need to restore an entire machine. Plus, two automated backup systems provide better insurance than one.
iCloud Drive’s Desktop & Documents syncing also provides some protection from lost files, but it’s even less comprehensive, omitting, for example, everything else in your Home folder, including your Downloads folder and local cache of mail. Plus, any technology that synchronizes also has the power to delete files from your computer. For this reason, I don’t consider synchronizing to be equivalent to backup. Real backup is one-way only.
The Time Capsule’s void has been filled by third-party NAS products, though I suspect many Mac users are generally unaware of this category of product. I have set up several NAS devices as Time Capsule replacements for clients, and while they do work, none are perfect, many are too complex or expensive, and some share problems (notably slow performance) with the Time Capsule while introducing a few of their own.
In this article, I will detail my quest to find or build a better Time Capsule and to solicit the collective wisdom of the TidBITS community to further that quest. To the extent that I conclude anything, it is that when it comes to network backup for the Mac, there are many choices, each with tradeoffs, and you’ll need to decide what makes the most sense for your situation.
But first, one product stands out purely on simplicity—Western Digital’s My Cloud Home. As a network backup device, it is nearly a direct equivalent to the Time Capsule. As you’ll see, it meets almost none of my preferred technical requirements, but it’s dead easy to set up, and it fulfills its purpose reliably. As such, if all the other possible solutions—some of which are less expensive, offer better performance, and provide more flexible restoration options—seem overwhelming, just get yourself a My Cloud Home and move on. For an extra level of protection, you may opt for the My Cloud Home Duo, a model that writes your backup twice across two drives.
Requirements for Network Time Machine Backup
I’m looking for a network Time Machine solution that isn’t just good for me, but for my clients, who don’t share my tech skills and many of whom I support remotely. Therefore, some of my requirements might not apply to a tech-savvy Mac user, though I bias toward simpler solutions even for my own use. I will present various options for various needs. I want:
- Minimal assembly required: The hardware has to be simple enough to coach someone through connecting the device to their network, at which point I can configure it further, if needed, by remotely controlling their Mac.
- Ease of configuration: I want something that I can easily set up myself, maintain remotely if needed, and, if necessary, even guide someone through its configuration.
- Reasonable cost: You can’t really put a price on backup, but we all must. Many NAS products are sold and priced as full-fledged servers, making them excessively expensive. Of course, reasonable cost is subjective, so I’ll present different solutions at different price points.
- Decent performance: Time Capsules and many off-the-shelf NAS products are dog-slow due to the vagaries of network connections (especially over Wi-Fi), underpowered CPUs, and, in particular, slow spinning hard drives. I want a NAS that can support a solid-state drive (SSD) and performs well when equipped with one.
- Support for USB 3.0 externally attached storage: I’d prefer to use an external SSD as the backup target unless high capacity requirements demand a hard drive. In a full-disk restoration situation, the drive could be directly connected to the Mac; I don’t want Wi-Fi inefficiencies to be a bottleneck during an emergency. Further, if there are unexpected problems with the backup volume, I want to be able to access the drive directly to see if those issues can be addressed, rather than having to go through the NAS, subject to whatever capabilities it does or doesn’t possess.
- Robust underlying file system: Time Machine’s approach on a network means that the target drive will contain one sparse bundle disk image, which contains the backup data, per Mac. The file system on which these disk images are stored needs to be designed for data survival during unexpected network disconnects and power failures. That rules out formats like FAT32, ExFAT, or non-journaled Mac OS Extended (HFS+); they lack this resiliency and are thus more prone to corruption of the backup. Better choices that macOS natively recognizes include APFS, journaled Mac OS Extended (HFS+J), and Microsoft’s NTFS. However, non-Apple NAS products are usually based on Linux, which does not support APFS or HFS+J, and whose NTFS support is mediocre; these products perform most reliably with the time-tested Linux native Ext3 or Ext4file systems. A drive formatted as such, when directly connected to a Mac, is readable with inexpensive third-party software, but see below for warnings about using it. (Some Synology products also offer Btrfs as an especially fault-tolerant underlying file system, which has the benefit of automatic snapshots, meaning the entire disk can be reverted in the event of corruption of the Time Machine backup. A disk formatted this way is not readable in macOS at all, though, for those with Linux skills, a virtual machine is a workaround.)
- Support for Time Machine via the SMB networking protocol:Apple’s stalwart file sharing protocol, AFP, has endured steadily eroding support in macOS for years, and as of macOS 11 Big Sur, Apple has reduced it to client-only operation. It’s not hard to anticipate a future in which Apple excises AFP entirely from macOS. Furthermore, non-Apple NAS products provide AFP via an open-source software package called Netatalk, whose development status doesn’t instill confidence. Instead, I recommend sticking with products that support Time Machine via the SMB protocol, based on the actively developed, widely used Samba package. Apple now defaults to SMB for file sharing in macOS and even states that SMB is a requirement for NAS products when using Time Machine, though it is not technically true… yet.
Even the Time Capsule wasn’t perfect, but could there be something out there that would meet most of these requirements?
Candidates for Replacing the Time Capsule
Alas, after trying numerous options, I found no one right answer that ticks off all of these boxes. Thus, I’ll present various products that I think are worth considering, so you can weigh the pros and cons yourself. Depending on your needs, the right network Time Machine device could be (in order of cost):
- A used 802.11ac or 802.11n AirPort Extreme
- A Raspberry Pi 400 or 4
- A router (even operating in a non-router capacity) with a USB 3 port and Time Machine support, such as a Synology MR2200ac or various Asus models
- A Synology DS118 or other model NAS
- A Western Digital My Cloud Home NAS
- An always-on, Ethernet-connected Mac, like the M1-based Mac mini
Here’s an overview of how well the products I considered fit with the capabilities I laid out above. Costs are approximate and do not include storage (except for the WD My Cloud Home). As of this writing, a 1 TB Samsung T5 external SSD costs $110 at Amazon; a 2 TB model is $220.
| Simple Install | Simple Config | Cost | Fast | External USB | File System | Sharing Protocol | |
| AirPort Extreme | Yes | Yes | $40* | No | 2.0 | HFS+J | AFP |
| Raspberry Pi 400 or 4 | Yes | No | $100** | Yes | 3.0 | Ext4 | SMB |
| Synology MR2200ac router | Yes | No | $140 | No | 3.0 | Ext4 | AFP |
| Synology DS118 NAS | No | No | $180 | Yes | 3.0 | Ext4 | SMB |
| Western Digital My Cloud Home (4 TB hard drive) | Yes | Yes | $200 | No | Not usable | Proprietary | AFP |
| M1-based Mac mini | Yes | Yes | $700 | Yes | 3.0 | APFS
HFS+J |
SMB |
* No longer made; this is the going rate on eBay for a used 802.11ac model. Any generation of the even older 802.11n model will also work; these units sell for around $20.
** Cost for Raspberry Pi 400 kit with power supply, mouse, and SD card with the operating system. The cost could vary for a Raspberry Pi 4 ($45) with a la carte power supply, SD card, keyboard, and mouse.
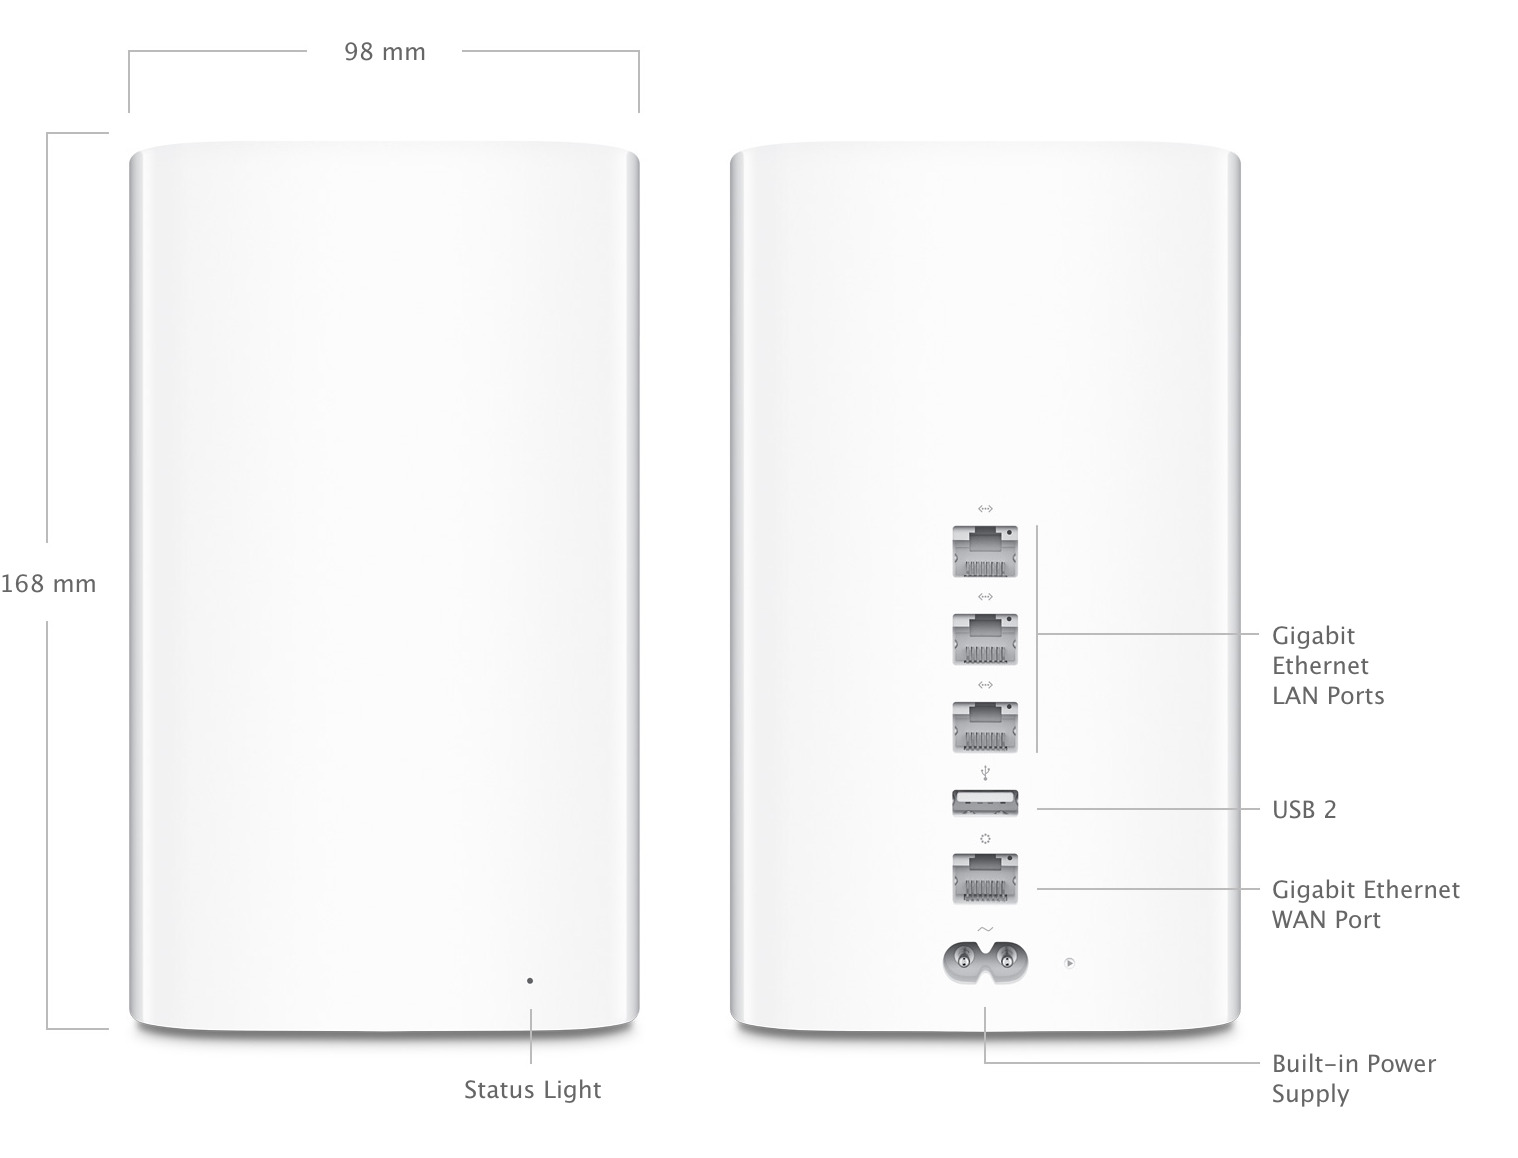
AirPort Extreme 802.11ac or 802.11n, Any Generation
To my surprise, a used AirPort Extreme is an attractive choice, not as a router or Wi-Fi access point, but simply as a network backup device when paired with an external SSD. The main reason I like it is its support for a reasonably robust native Mac file system, Mac OS Extended with journaling, on an external drive. An AirPort Extreme is quick to get up and running, and its price can’t be beat if you don’t mind used hardware. However, I’m less sanguine about an AirPort Extreme with an external hard drive due to its slow performance. I would probably look toward another solution if you require higher capacities.
This discontinued product, of course, has plenty of knocks against it: Apple will laugh at you if you call for help, its external drive speed is limited to USB 2.0, leading to long initial backup times and subsequent “Preparing Backup…” phases, and it requires that a client Mac use AFP rather than SMB to connect. It’s probably not a long-term solution, especially if Apple one day drops either AirPort Utility or AFP from macOS, but for what it costs, it doesn’t have to be, and, for now, it does the job. The 802.11ac model (sixth generation) performs a bit better than older versions, has the newest (and thus most optimized and bug-fixed) internal software, and is still nominally supported by Apple (but I wouldn’t count on that for long). The older 802.11n model (fifth generation or earlier) also works, but I recommend it less, as it is completely unsupported, somewhat slower, and has more out-of-date internal software. Still, you may prefer its lower price and much shorter physical height—though larger footprint. (You can’t use an AirPort Express; it doesn’t support external drives.)
If you do get an AirPort Extreme for network Time Machine, after initial setup, ensure it is in bridge mode (DHCP & NAT networking turned off) and disable wireless networking, so it doesn’t conflict with your existing router and Wi-Fi network. You may also use multiple drives as Time Machine targets by attaching a powered USB hub to the AirPort Extreme. I don’t recommend using any AirPort Extreme as a router because Apple no longer provides security updates for its firmware.
I specifically recommend an AirPort Extreme over a Time Capsule, though you could technically use the latter, too. However, Time Capsules are prone to overheating and component failure, and you might also accidentally back up to the slow, very old drive within. If you do use a Time Capsule, I would still back up to a USB-attached external SSD.
Raspberry Pi 400 or 4
The Raspberry Pi is a very tiny, very cheap ARM-based computer that normally runs Linux. The Raspberry Pi 4 is just a bare credit-card-sized circuit board to which you can attach, at minimum, Ethernet, USB drive, USB-C power, and a Micro SD card containing its operating system. If you wish, you may also attach a keyboard and mouse via USB, and a screen via Micro HDMI. The Raspberry Pi 400 provides a housing with an integrated keyboard, making it larger but easier to use when directly connecting it to a monitor. Neither includes a USB-C power supply, so make sure you get one, or a kit that includes one. Or you can repurpose a power adapter from a Mac or iPad. For the Raspberry Pi 4 only, there are also various integrated UPS (uninterruptible power supply) kits you can purchase to protect your Time Machine backup from corruption due to sudden power loss.

Because it’s a full-fledged computer, the Raspberry Pi can be customized to do whatever you like, including being a network Time Machine appliance with all the characteristics I’m looking for. It also yields some of the quickest backups compared to the other choices. The challenge is needing the Linux skills required to get it all going. (I intend to release a publicly available script, or premade boot disk image, to ease the setup process, though I have no time frame for when that will happen.) If you don’t have a monitor, you can access the Raspberry Pi from your Mac either graphically with the macOS Screen Sharing app or via the command line using Terminal. If you know what you’re doing, you can even set up a Raspberry Pi without a screen or keyboard from the very start, configuring it entirely from your Mac via SSH and VNC/RDP.
Apart from the challenge of setup, the major negative with using a Raspberry Pi as a network Time Machine device is that it likely requires Linux skills if Time Machine over your network stops working as expected. Further, as with NAS products, its Ext4 file system is foreign to macOS, requiring Paragon’s ExtFS software if you want to connect the external drive directly to a Mac. See below for warnings and cautions when using ExtFS; it works great if you’re careful, but it can ruin your backup if you’re not.
Synology MR2200ac Router
Synology is not as well-known for its router products as it is for its NAS products, but the routers are pretty neat, running a stripped-down version of Synology’s NAS operating system internally while supporting external drives via USB 3.0. The MR2200ac is the cheapest model, and I was attracted to it due to its lack of visible antennas, which I don’t need for network Time Machine purposes. I disabled all its Wi-Fi and routing functions, attached an external SSD to its USB port, and sorted through its Web interface to share the drive for network Time Machine.
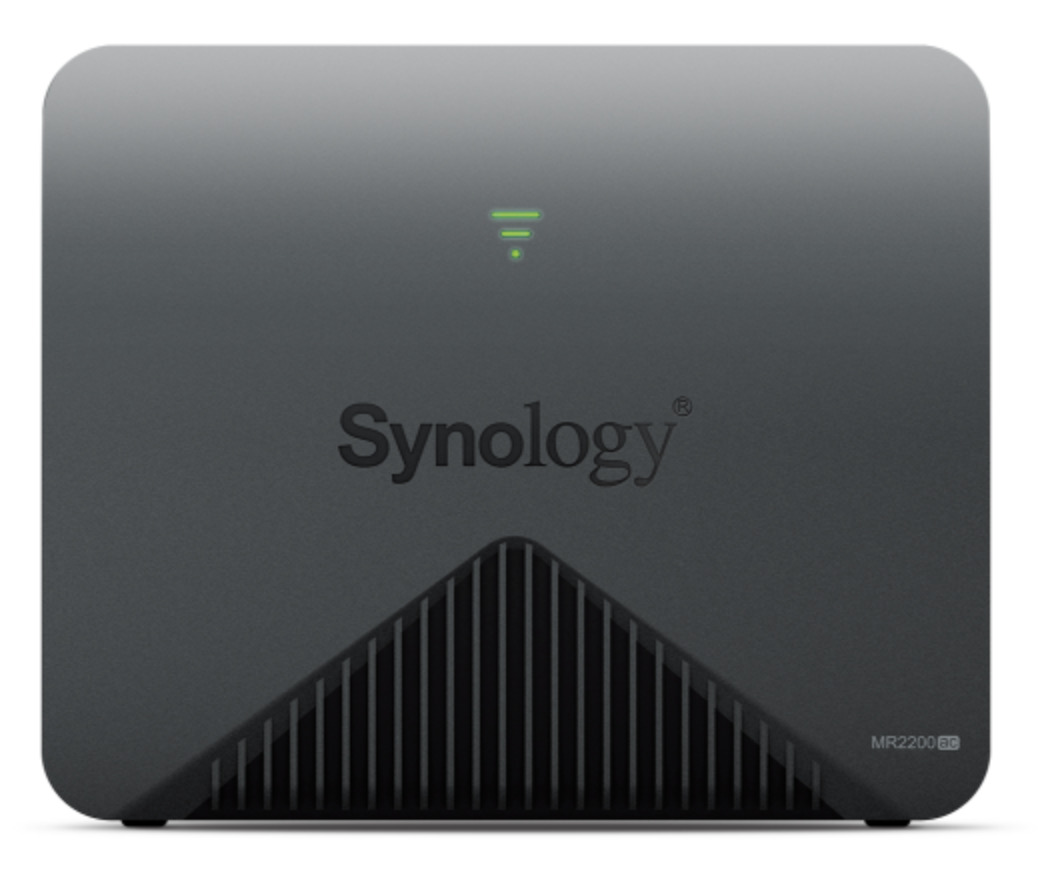
I was disappointed to discover that even though Synology’s NAS products offer network Time Machine connections via SMB, its router products do not, requiring that client machines connect via AFP. I also was underwhelmed by the network performance, even exclusively over Ethernet, with copying at speeds I might expect from a directly attached USB 2.0 drive. In other words, this device didn’t do much more for me than an AirPort Extreme did, and it has the negative of the Linux Ext4 file system that requires handle-with-care third-party software on a Mac (see warning below) if directly attached. Nonetheless, it is a product that is still manufactured, sold, and supported. Still, if I were going to go in this direction, I would prefer the Synology DS118 NAS for a bit more money, with its better performance and support for SMB, or I would try another brand and model of router.
In fact, I did that: I happen to have an Asus RT-AC68U router, which also offers a USB 3.0 port and network Time Machine. However, it also suffered from poor performance and requires AFP. This particular model of Asus router requires the storage drive to be formatted with the older (but still adequate) Linux Ext3 file system, which it can do via its Web-based interface.
Several other router models from these vendors and others offer network Time Machine as a feature, and there’s a website that has ranked their performance. It clearly lists both of the ones I tried as weaker entries, but several of the better ones cost as much or more than a NAS. Still, with some research, a router-as-network-Time-Machine may well be a viable option for you, especially if you’re in the market for a new router anyway.
Synology DS118 (or Other NAS Model)
Synology is well regarded for its NAS products, and with good reason; its DSM operating system, based on Linux, is reasonably easy to get around via its Web interface, and it provides a lot of desirable options and capabilities for a standalone server. As a Time Machine appliance, the Synology DS118 offers much of what I want.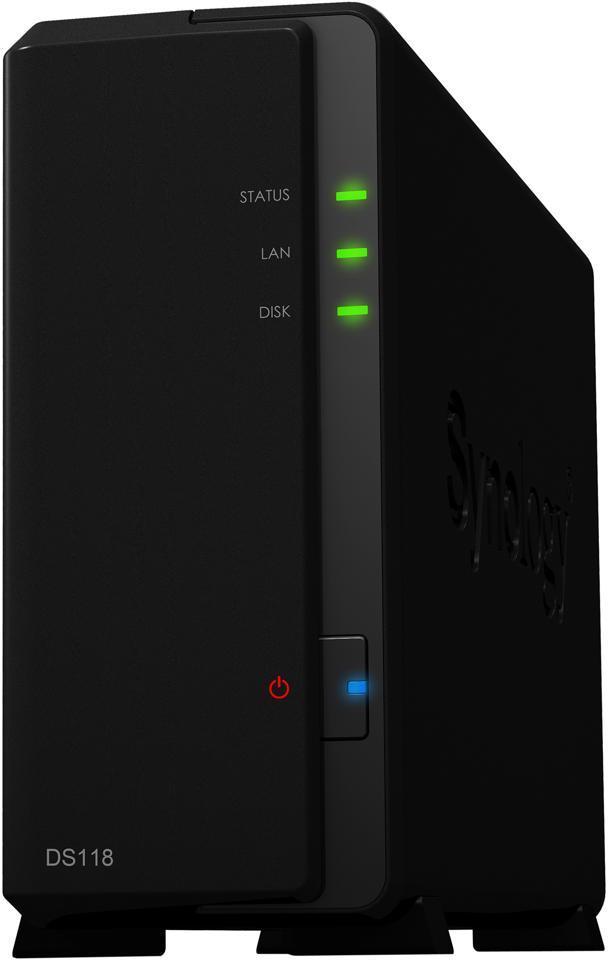
The major negative is that, like most NAS products, it requires an internal SATA drive, which isn’t supplied, so you’re gonna have to bust out your screwdrivers. I recommend just getting a cheap 128 GB internal SATA SSD and then connecting an external SSD (or hard drive, if you need more capacity) to the unit’s USB 3.0 port to use as a backup target. I strongly prefer having the option of being able to directly connect the backup drive to a Mac when restoring, but if you’re content with network-only restoring, you could instead just get a larger internal drive (or drives, if you elect for a multi-bay model).
While it’s not difficult to set up a Synology NAS, configuration is more involved than with some of the other products discussed. You will want to ensure, using its Web interface, that your shared folder (e.g., the root of your external drive) is configured to advertise SMB Time Machine connections over Bonjour/mDNS, and that the drive is formatted for Ext4 (or Btrfs, if you know what that is and are comfortable choosing it, and if Btrfs is supported by the Synology model you own; the DS218 and DS220+ are the minimum options). Note that Synology products won’t even recognize a drive as being eligible for reformatting if it’s not already in one of its natively recognized formats, which can be an issue with external drives that come preformatted for ExFAT. To resolve this, use Disk Utility on your Mac to format the drive as FAT32 (and, as long as you’re bothering, give it a GUID Partition Map scheme), then reformat as Ext4 in the Synology interface. Avoid the temptation to use HFS+ as a file system; like all Linux-based products, the Synology operating system does not support the more reliable journaled variant.
If you choose to attach your Ext4 formatted backup drive directly to your Mac when restoring, you will need Paragon’s ExtFS software to read its contents, but please see the warnings below before doing so. If your drive is instead formatted as Btrfs, there is no way to read it on your Mac apart from a Linux virtual machine.
Western Digital My Cloud Home
Western Digital’s My Cloud Home gives me almost none of what I want, as you can see from the chart above, but it’s essential to include because there is no easier network Time Machine drive to set up (including the Time Capsule). You literally just plug a My Cloud Home into an empty Ethernet port on your router, and it’s ready to use, without any software, registration, or configuration (you can actually ignore all of the setup steps). Just set your Macs to use the My Cloud Home as a Time Machine destination, signing in as Guest when prompted for authentication. That’s it.
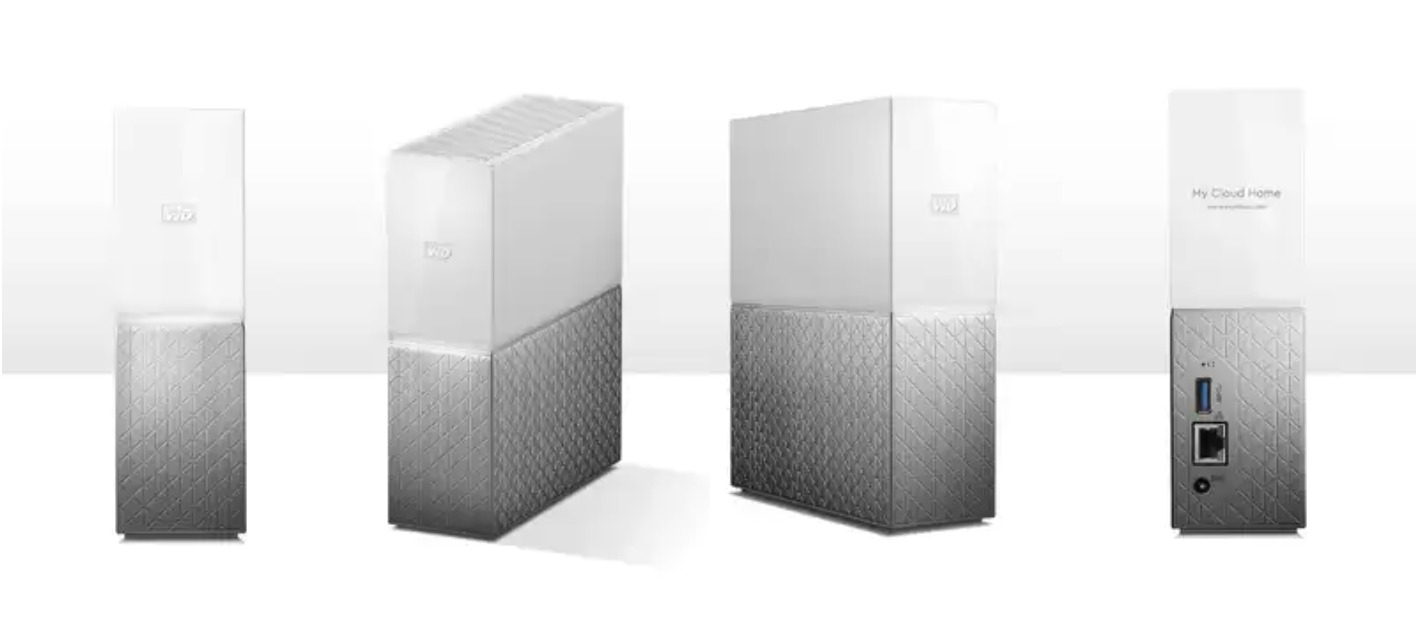
The triviality of setup makes the My Cloud Home easy to recommend to my clients who need a plug-and-play remote installation and who don’t require an SSD. The My Cloud Home Duo is a dual-drive version that provides redundancy; your backups are written to two drives, rather than one, so if one drive fails, you don’t lose your backup history. Because no password is required to access the drive itself, I recommend that you encrypt your Time Machine backup when you initially set it up on your Mac.
A word of warning: if you have any intention of using this product as a network file server, consider instead a Synology NAS, such as the model discussed above, or any other traditional NAS device, such as Western Digital’s My Cloud EX2. The very simplicity that makes the My Cloud Home an appealing Time Capsule replacement also makes it an inferior NAS device, lacking even the most basic features you would expect from a typical NAS product. The My Cloud Home is not designed to be an ordinary local network file server, but rather a “consumer cloud” device, so all user and even much file management must be performed via the sluggish and limited WD Discovery desktop software or My Cloud Home mobile app; no internal Web interface is provided. Access to private folders for individual users isn’t available in the absence of the software, and Mac users cannot set up additional shared public folders beyond the “TimeMachineBackups” folder provided by default. Consider the My Cloud Home to be a Time Capsule replacement, nothing more.
Mac Configured for Network Time Machine
Using an entire Mac for network backup is not the most elegant solution and feels like overkill, but it is the only actively developed network Time Machine product made and supported by Apple, and it provides all of what I want. It’s clunky and expensive, given the $700 cost of Apple’s cheapest M1-based Mac mini, so I’m not as enthused as I might be. However, it may cost you nothing at all, if you have an older Mac you wish to dedicate to the task, or if you use a desktop Mac that you can leave on 24/7 and that’s connected by Ethernet to your router. If not, you may also reduce the cost by buying a used Mac.
Although network Time Machine capability, as demonstrated by this Apple support page, is available from macOS 10.13 High Sierra onward, I advise that you run the latest version of macOS available for your Mac to benefit from the most recent security and bug fixes. All Mac models from late 2009 onward are eligible (with the exception of the late 2010 MacBook Air, which lacks any means of connecting Gigabit Ethernet). If you opt for a Mac laptop or iMac that has USB-C ports but no Ethernet port, you will need a USB-C to Gigabit Ethernet adapter, such as this Anker model ($25). For older Mac laptops with neither Ethernet nor USB-C ports, you can purchase an Apple Thunderbolt to Gigabit Ethernet Adapter ($29). If your router is in a tight space, you might wish to consider a used 11-inch MacBook Air or a Mac mini set up to operate without a screen, keyboard, and mouse. For either, utilizing macOS’s screen sharing capability should ease ongoing maintenance. If the Mac you have chosen for network Time Machine also requires backup, its own Time Machine should target a separate volume on the drive being shared, or a different drive entirely.
When using a Mac as a network Time Machine device, I recommend backing up to an external SSD (or hard drive, if high capacities are required), rather than the drive inside the Mac, for maximum flexibility, but that’s a judgment call on your part. One advantage to this setup is that you have many choices for restoring, such as Migration Assistant, Target Disk Mode (or disk sharing on an Apple silicon Mac), and backup software such as Carbon Copy Cloner.
How Would You Restore from a Network Time Machine Backup?
Backup is actually less than half of the equation—restoration is much more important. It doesn’t matter how good your backup is if you can’t restore quickly and reliably. That’s especially true if you need to restore an entire drive. So what is the best way to get to your Time Machine data? There are a variety of issues associated with both hardware and software.
Disconnect from NAS, Connect to Mac
Apple always intended the Time Capsule to operate exclusively over a network connection—its internal drive is not designed to be removable, and its contents are not accessible via USB or Thunderbolt. As such, it was great for backing up laptops but terrible for restoring—depending upon how much data you had, you could wait all day and all night, especially over Wi-Fi. Sometimes you could wait many minutes while looking for a single lost file, hoping that earlier dates would eventually make themselves available.
Some of the NAS products are a bit better in that regard, particularly if you put an SSD inside them. But, when restoring data, direct attachment to a Mac will always yield the quickest operation, even for a hard drive. For this reason, I focused on network backup to external drives, which can be quickly detached and plugged into a Mac, if restoring via the network is not working well.
Attaching a network Time Machine drive directly to a Mac does work, but it has always been unsupported, and it has its quirks, as detailed below. The volume contains a sparse bundle disk image, which itself contains an APFS-formatted volume with nothing but backup snapshots, assuming the backup was started while using macOS 11 Big Sur or later. Time Machine disk images created with macOS 10.15 Catalina or earlier remain formatted as HFS+J, even when used with newer versions of macOS; these utilize directory hard links instead of file system snapshots, so some of the comments below may not apply. You must mount the disk image prior to restoration.
Mac Compatibility of the Underlying File System
The underlying file system of the network Time Machine volume adds to the complexity. If you are using a Mac or an AirPort Extreme for your network backups, great—the backup disk image sits on an APFS or HFS+J volume that your Mac natively understands (which is one reason I like these solutions). When you mount the disk image, you can easily browse the backup snapshots in the Finder, or you can use the Time Machine interface by holding down the Option key and choosing Browse Other Backup Disks from the Time Machine menu.
However, mounting the backup disk is a challenge if your backup drive came from a third-party NAS, router, or Linux computer like a Raspberry Pi. While it’s possible to use an HFS+ formatted volume on these products, I don’t recommend it because the lack of journaling capabilities increases the risk of corruption of backup data.
So, what to do? I was hoping that Microsoft’s NTFS as the file format for the Time Machine volume might provide a happy middle ground, as macOS will natively recognize and mount it read-only (in my view, that’s a plus in a data recovery situation). Unfortunately, I discovered that standard Linux NTFS capabilities are very slow and less than fully featured, omitting some of the journaling capabilities that would make this file system a dependable choice. I was excited to learn that the latest version of the Linux kernel (version 5.15) has all-new NTFS capabilities contributed by Paragon, authors of commercial file system translator software, and indeed I found their new NTFS3 Linux kernel module to perform well on a Raspberry Pi. Unfortunately, it’s not clear that the developers have integrated all of the NTFS journaling features yet, and, worse, I experienced an NTFS-formatted volume that would no longer mount after a sudden power disconnect. I’m hopeful that NTFS might yet become a way forward in the future, but, for the time being, my experience led me to shelve this idea in favor of the tried-and-true Ext4 file system developed for Linux.
Access Linux Ext4 from a Mac, Carefully
Fortunately, Paragon makes a $39.95 Mac utility called ExtFS, which lets macOS mount a volume formatted with Linux Ext4 or Ext3, as you would likely find when directly connecting a drive that came from a third-party NAS to a Mac. I sought to avoid relying on this software because it’s a system extension, meaning permissions must be granted, your Mac must be restarted, you can’t use it while in Recovery, Apple could disable it in the future, etc. But it works… sort of. Alarmingly, ExtFS reliably corrupts the sparse bundle disk image if you attempt to open it, making ExtFS a dangerous bit of software to use in a data recovery situation. (I have reported this bug to Paragon, and the company has added the bug to its database.)
So, before attempting to mount the disk image, you must designate the drive as read-only. This is easily accomplished using Paragon’s software; once done, you just unmount and remount the drive, which will then be shown as read-only. At this point, you may safely open the disk image. If you follow this sequence, you will be able to recover individual files or an entire drive, but the razor’s edge you are walking on to get there might advocate for a second, third, or fourth backup destination, whether via Time Machine or another backup solution. If you have the free space, you might also want to first copy the disk image to an APFS or HFS+J volume and mount it from there.

Read-Only Issues
Another quirk of Apple’s new APFS-based Time Machine is that if you mount the backup disk image read-only, as you must when using Paragon’s ExtFS software, you can’t see the backup snapshots in either the Finder or the Time Machine restoration interface. To work around this, you can use software like Carbon Copy Cloner, which can see those snapshots.
An alternative solution is to mount the disk image from the command line in Terminal using a shadow file stored on a writable volume, which will make the disk image faux read-write (changes go into the shadow file, not the actual disk image). When mounted this way, backup snapshots appear as usual in the Finder. The syntax is:
hdiutil attach -shadow /tmp/tmvolume.shadow /Volumes/[Disk Volume Name]/[Backup Disk Image Name].sparsebundle
I strongly recommend making sure you can restore individual files and even entire drives in a controlled test situation before you find yourself in urgent need.
Full Drive Restore via Migration Assistant
Should you wish to restore a Mac’s entire drive, it’s no longer possible, as of Big Sur, to perform a Time Machine full-disk restoration from Recovery. Migration Assistant is your only option. You must first reinstall macOS to an empty volume, and then, during initial setup, choose Not Now for data transfer (and in general skip past everything you can, including Apple ID sign-in) to create a user and then install Paragon’s ExtFS if necessary. You may then mount the backup disk image from the Finder (or command line) prior to running Migration Assistant.
If you are using ExtFS, remember to designate the volume containing the disk image as read-only, as described above, before mounting the image. It is not necessary to mount the image read-write via a shadow file for Migration Assistant to be able to transfer from it, even though the backup snapshots are not otherwise visible. You can just double-click the image file in the Finder and then run Migration Assistant after it mounts.
Accessing Older Backups when a Drive Is Directly Connected
When you directly attach a network Time Machine drive, Migration Assistant will see only the most recent backup; it won’t present any backup history. If that’s what you need, no problem. But if you want to restore an older backup, you have a few workarounds at your disposal.
- You can mount the disk image with a shadow file, as described above, and then (non-destructively, because of the shadow file) delete recent backups using the Finder until the backup you want becomes the most recent entry.
- You can copy the disk image to an APFS or HFS+J volume, provided you have the space; double-click the copy to mount it, and use Finder to delete newer backups blocking access to the one you want.
Let’s Back It Up
This odyssey was not as singularly satisfying as I was hoping it would be, but it has been illuminating. My requirements were never what Apple had in mind, even in the era of the Time Capsule. But, with the Time Capsule no longer sold and barely supported, I was free to think about what might work best for network Time Machine backups.
In the end, I’m unsurprised that there is no single right choice, and, due to currently available products using foreign file systems, there probably never will be, at least from my point of view. But I hope what I’ve learned will help you decide how best to back up your Macs over your network. If you have anything to contribute from your own experiences and experiments, please post them in the comments!
Contents

Click for special offers to Mac Users Groups members.

Website design by Blue Heron Web Designs

Click the image for information about advertising on this website.