
MacTalk
May 2024
Notes on Post-Pandemic Business Travel
I spent much of last week in Salt Lake City, where I spoke at the ACES Conference for Apple consultants and managed services providers (many of whom are TidBITS Content Network subscribers). It was my first conference and solo business trip since the pandemic started in 2020, and it took some time to update my travel gear and habits.
Packing Pro
I’m surprised I haven’t written about Packing Pro, the iPhone app I’ve used since 2018 to generate trip packing and preparation lists. It’s essentially a well-constructed and easy-to-use database dedicated to trip planning.
You create a trip, which has a name, dates, and notes. Then, you add items you want to pack, selecting them from an extensive pre-defined collection, along with tasks you need to accomplish before leaving (watering plants, refilling the cat food, hiding backup drives just in case a thief absconds with computers, etc.). As you assemble your suitcase and work through your jobs, you mark those items as completed in Packing Pro. That’s it, unless you’re even more OCD (obsessively cataloging data) than I am, at which point you can add all sorts of metadata to each item.

What I like most about Packing Pro is that it remembers each trip, making it easy to replicate a previous packing list. Before Packing Pro, I had a simple Nisus Writer Pro document that I’d print and manually adjust for each trip, but a week-long family trip to California for Christmas requires rather different preparation than a several-day solo trip to Salt Lake City in the spring.
Packing Pro may not feel as though every pixel has been placed by a hipster designer, but developer Quinn Genzel has seemingly thought of everything when it comes to functionality. You can sync your lists via iCloud, share them (via email, AirDrop, Dropbox, Box, iCloud Drive, and email), customize the master catalog of over 400 items however you want, tweak the design, and more. It has a one-time payment of $2.99 (a few optional $0.99 in-app upgrades are also available) and is well worth it if you obsess over your data as much as I do. (I’m a piker—you should have seen my grandmother’s packing lists!)
Flighty
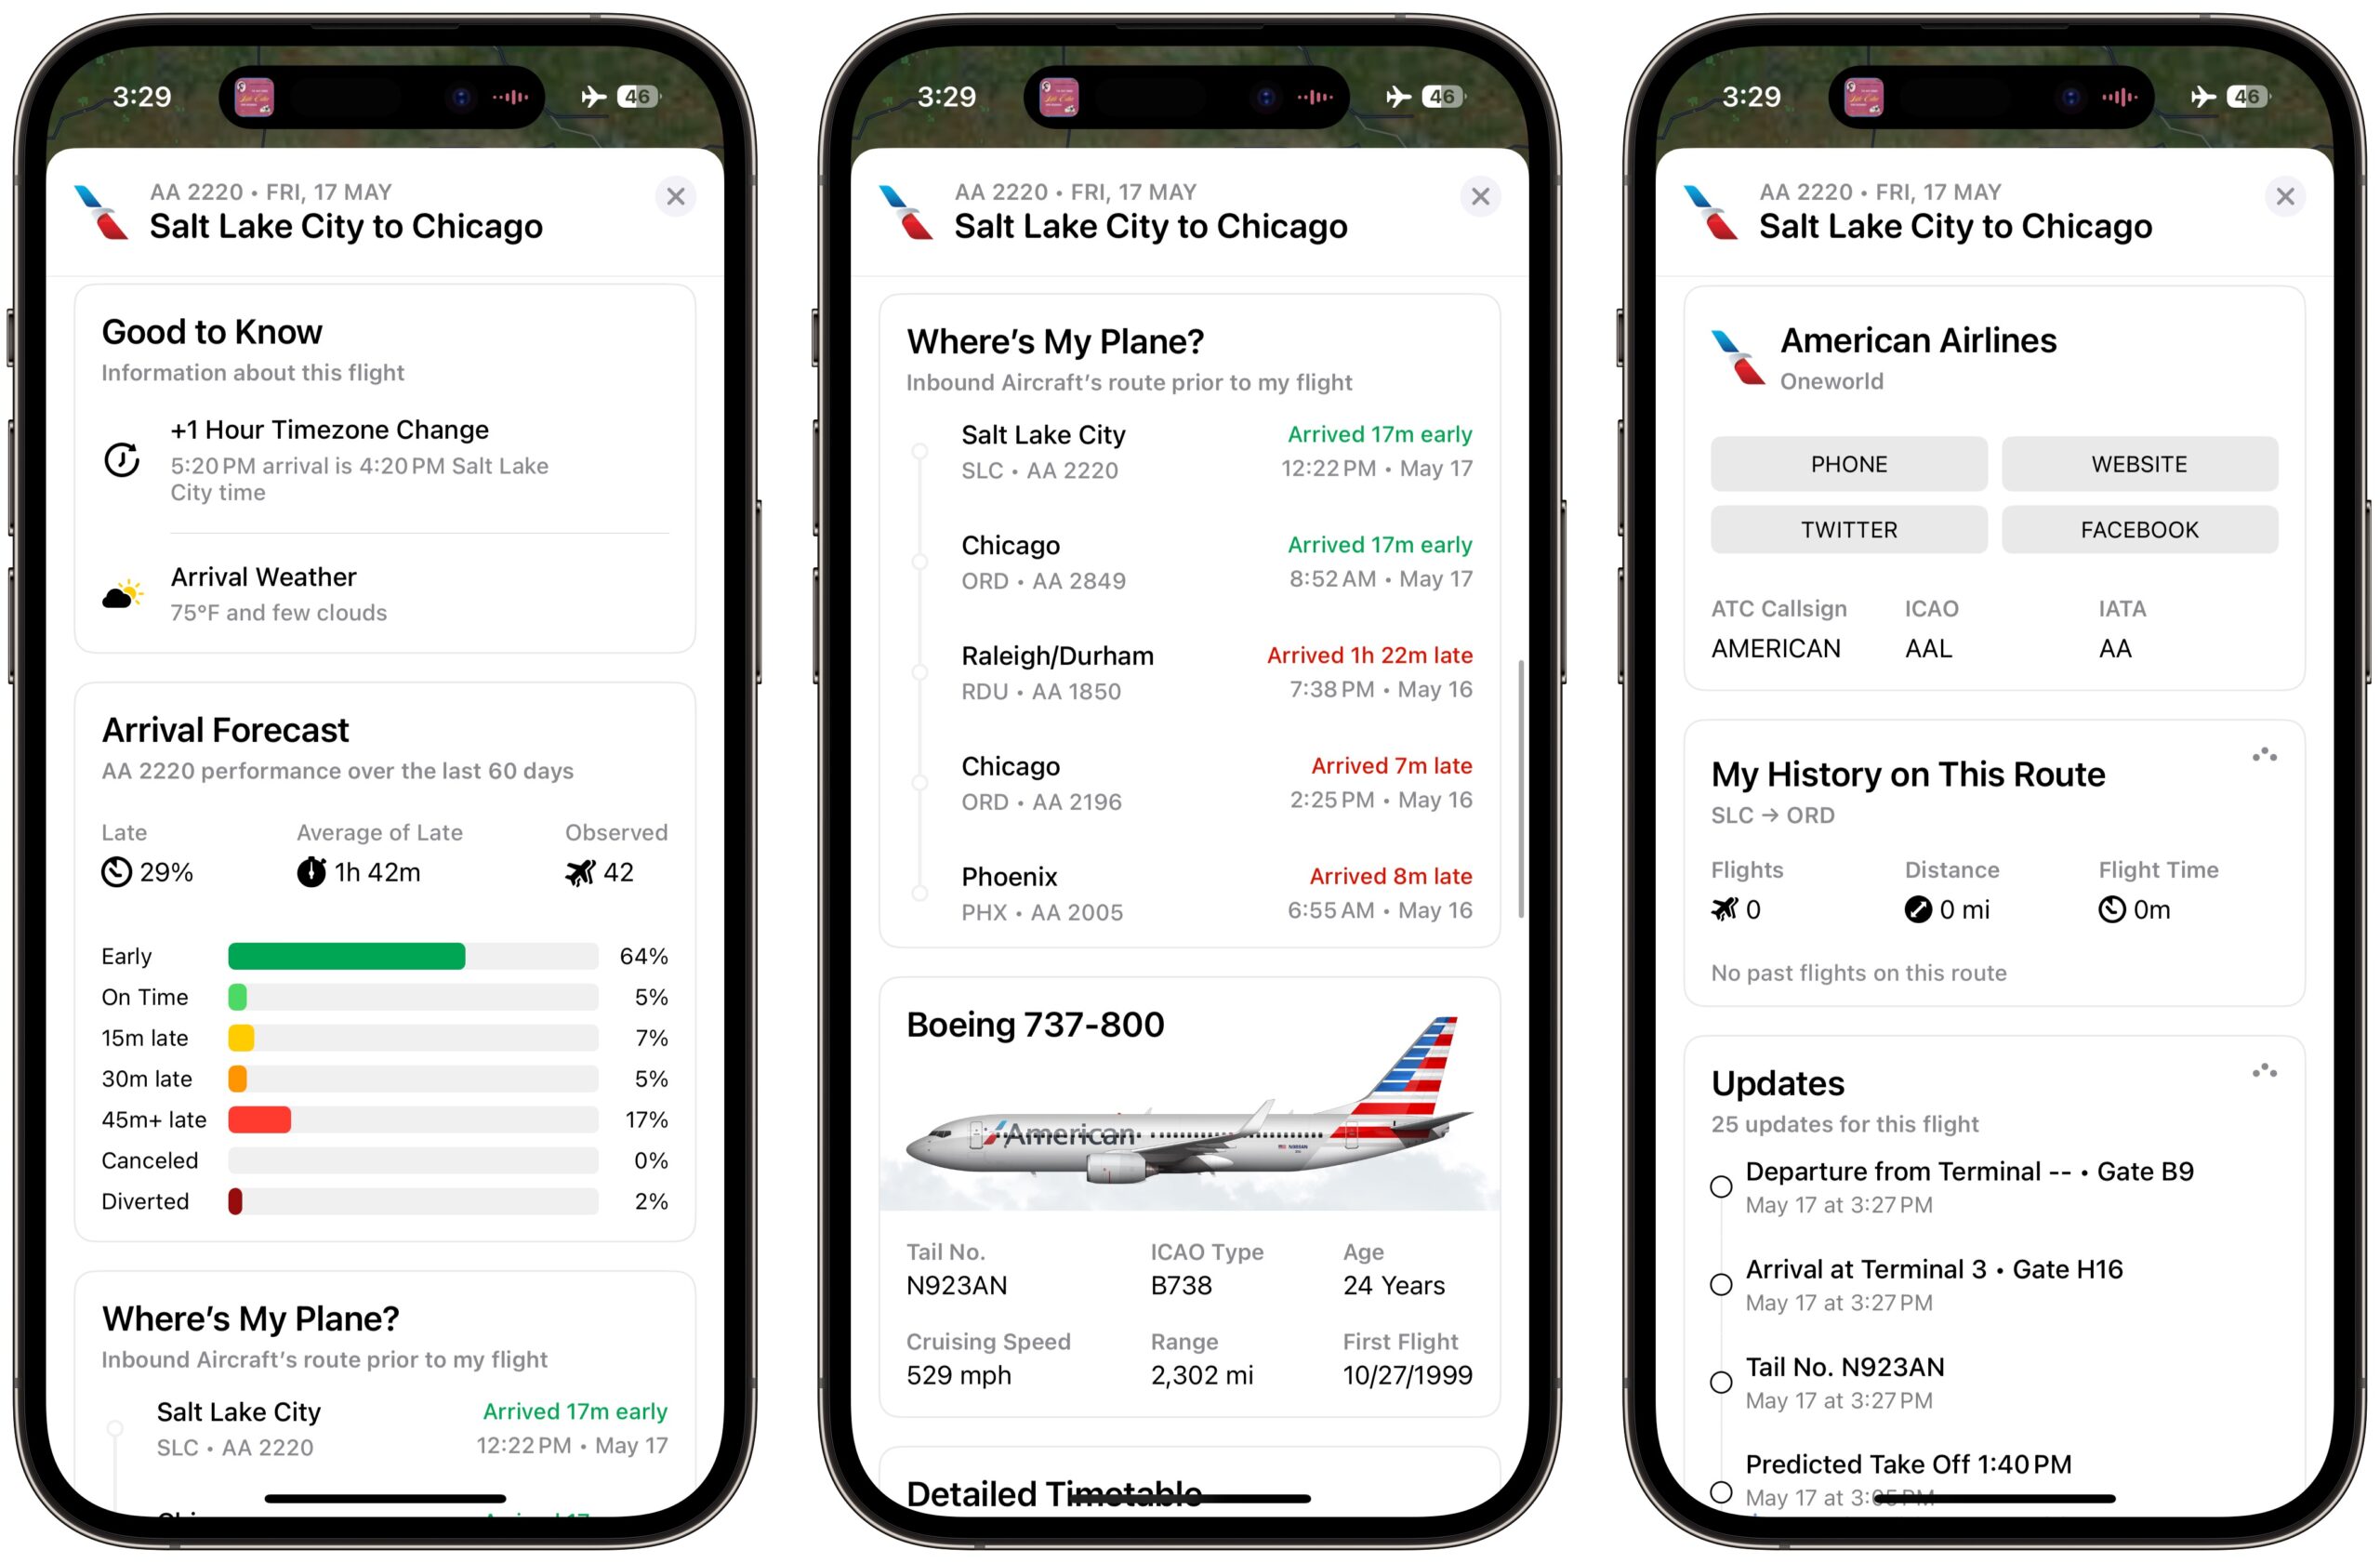
I’ve written about how airline apps have become extremely helpful (see “Using the Delta Airlines App and Apple Business Chat in a Snowpocalypse,” 15 November 2019), but this was my first test of Flighty, an independent flight-tracking app that’s a poster child for Apple technologies. Like Packing Pro, it’s essentially a database of information surrounding a trip that tracks flight numbers, arrival and departure times and gates, plane locations, historical arrival times, and much more. Unlike Packing Pro, Flighty has a gorgeous, modern design and provides a Lock Screen widget, displays Live Activities in the Dynamic Island and on the Lock Screen, and keeps you up to date with an elegant Apple Watch app.
You seed Flighty with flight numbers on specific days, and you can differentiate between your flights (which Flighty tracks forever) and those of friends (which it deletes after you’ve made your airport pickup run). A top-level My Flights screen summarizes upcoming flights underneath a map showing the flight plan. Tap a flight to focus the map on the plane and see more details. The map can show weather radar and even other planes nearby.

Oh, the detail! Scroll down to see vastly more data, including timezone changes, arrival weather, what type of plane you’re on (I’m sure Boeing 737s are TOTALLY FINE NOW), a detailed timetable, contact information for the airline, your history on that route, and even an archive of updates. Those updates can make Flighty a little chatty—tone it down in the settings if you want—but as someone who finds information reassuring, I appreciated knowing that the incoming plane for my next flight was 7 minutes late.
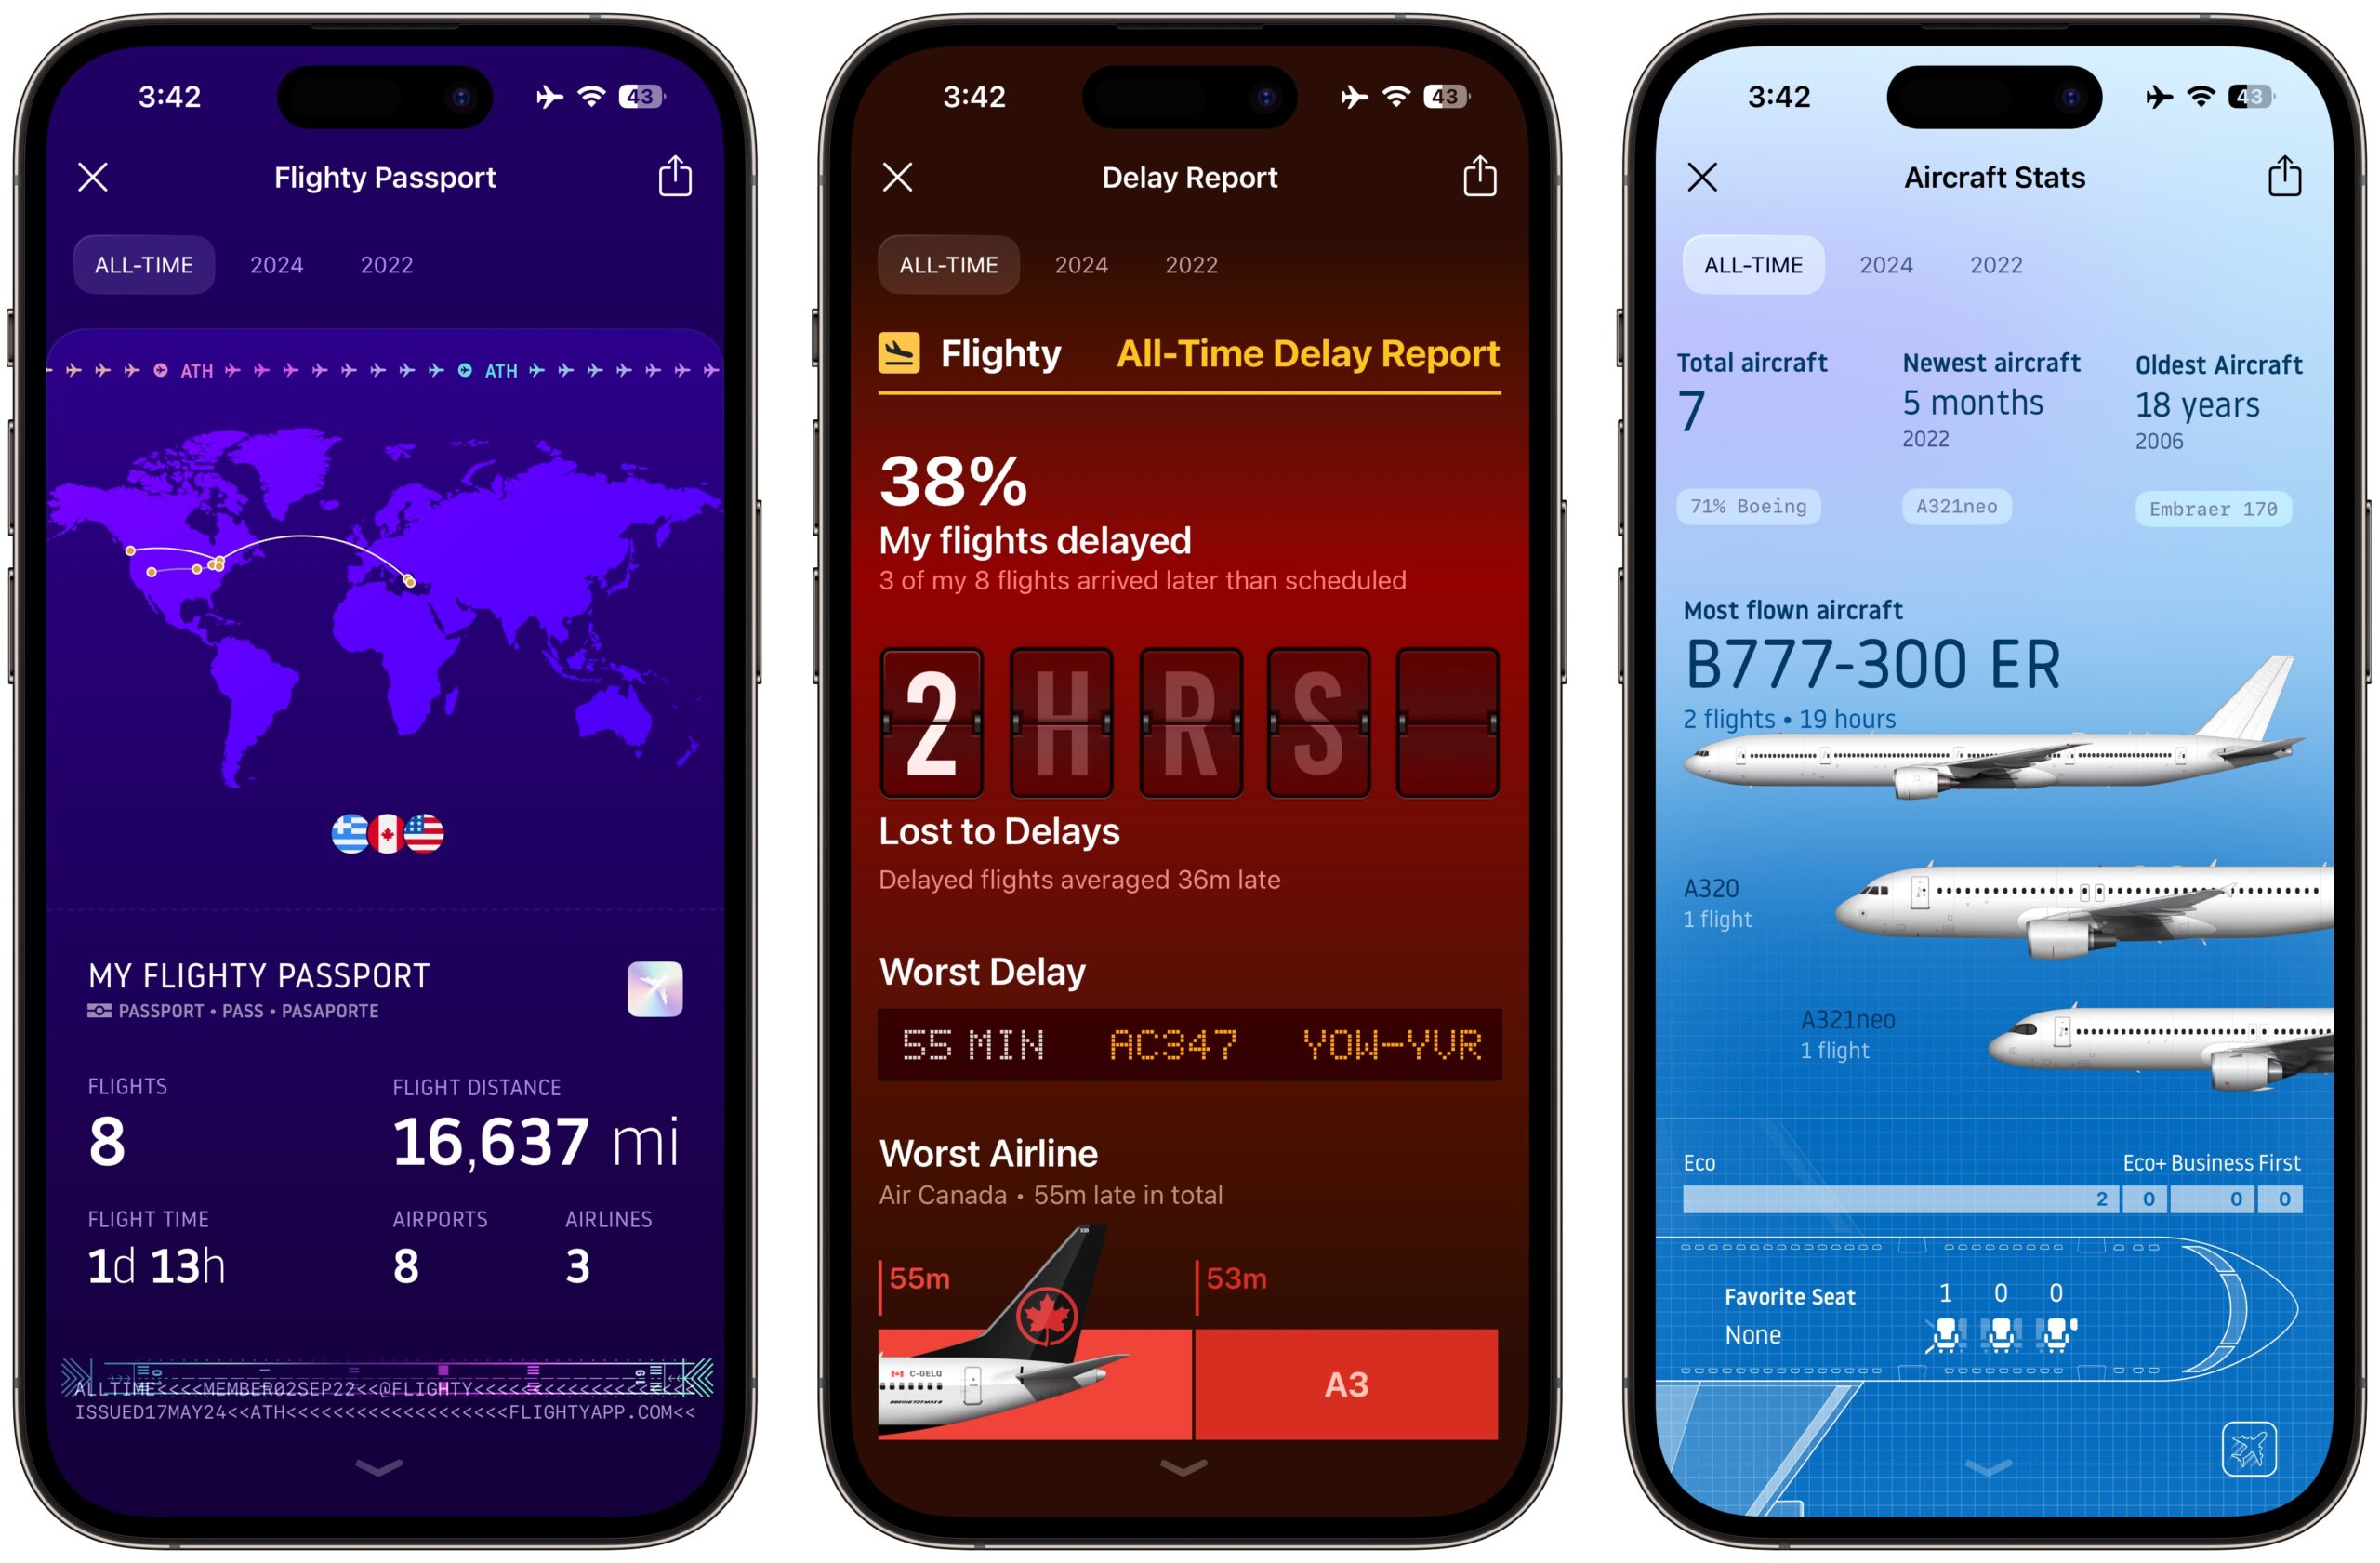
The more I poked at Flighty, the more impressed I became. The developers are serious travel geeks, so the app automatically builds gorgeous screens for the Flighty Passport that tracks all your flights (even extracting past ones from calendar events); reports on your total, average, and worst delays; and reveals details about which aircraft you’ve flown and how old they are. Such data is purely interesting trivia for me, but someone who travels regularly for business could use it to discover trends to improve their travel experience.
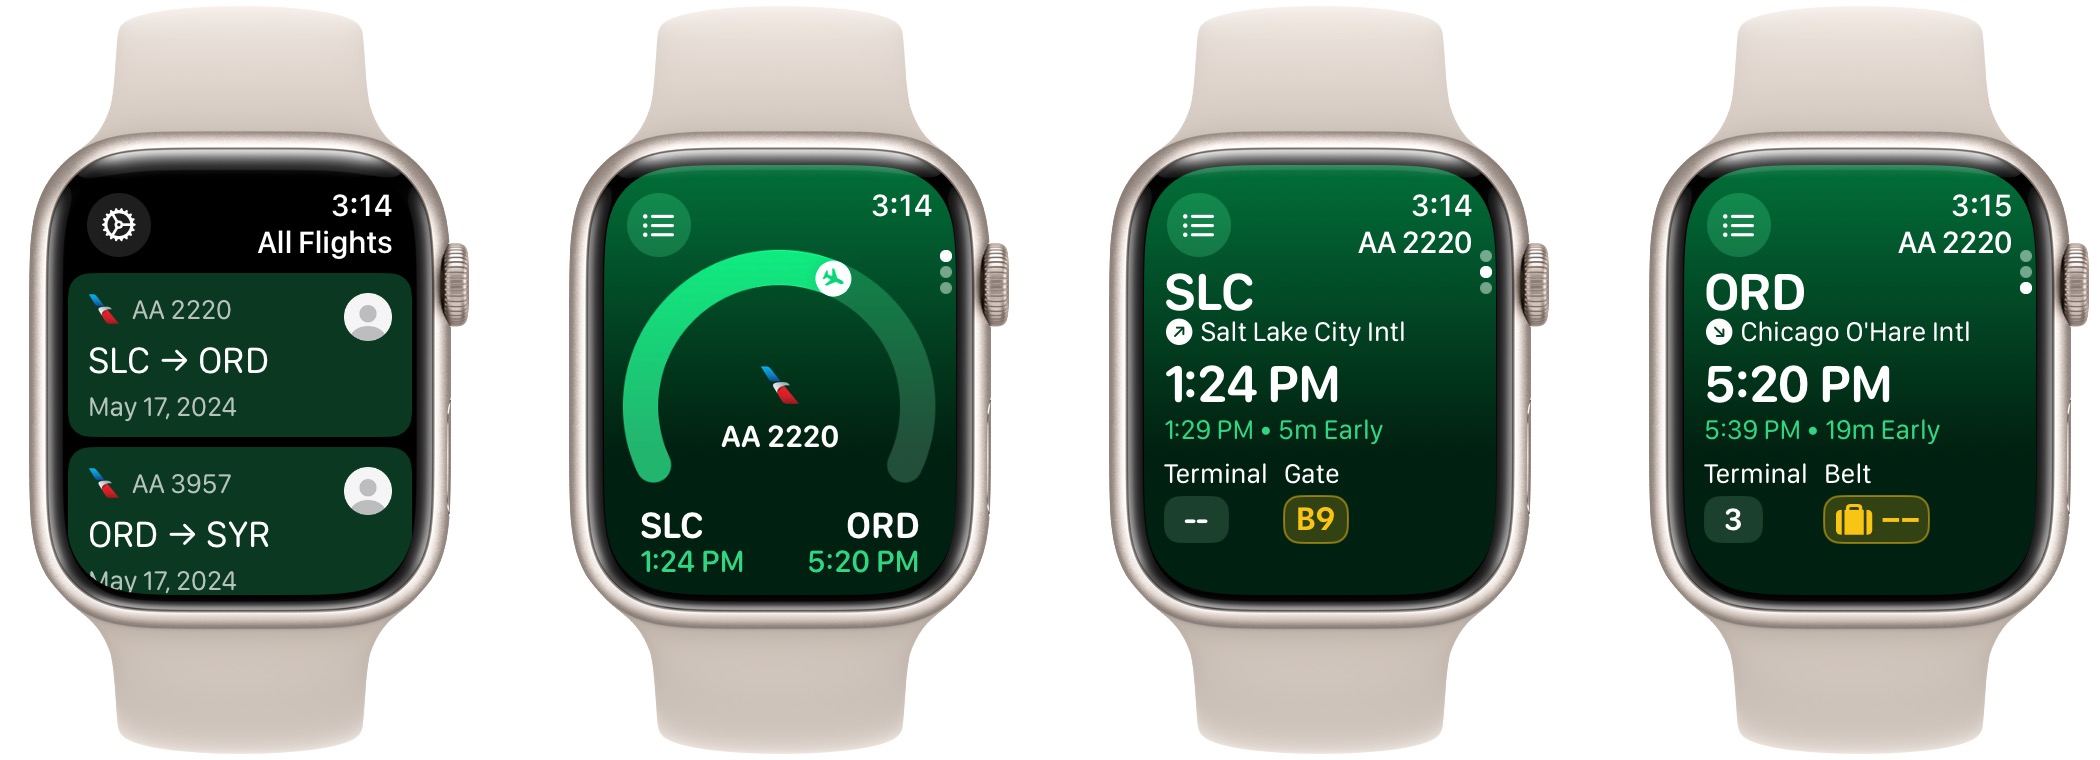
Flighty’s Apple Watch app is also well done, with a top-level screen showing flights and three detail screens for each flight showing progress, departure, and arrival information. I use my iPhone heavily while on planes, but I could imagine times when you wouldn’t want to haul it out just to check progress.
Many of these capabilities may be overkill for those who seldom travel. The American Airlines app did an acceptable job of alerting me to flight information, and you still need it (or the equivalent from another airline) to check in, add boarding passes to Wallet, and deal directly with the airline. In fact, the American Airlines app one-upped Flighty by providing time estimates and directions for walking between gates, something that can be a source of stress on tight connections.

Frequent flyers will most appreciate Flighty, but even casual travelers (or those who often pick people up from the airport) will find it helpful. At its base level, Flighty is free, and everyone’s first flight with Flighty receives all the Flighty Pro features for free. They include real-time flight tracking, push notifications, calendar sync, email import, delay forecast, plane locations, and more. (I have a test version of Flighty Pro, so I’m not entirely sure which features I’d miss if I lost access to the paid features.) Subscribing to Flighty Pro costs $3.99 for a week, $5.99 for a month ($10.99 for a family), $47.99 for a year ($89.99 family), or a single $249 purchase for a lifetime license ($449 family).
T-Mobile In-flight Wi-Fi
Life has been busy of late, and my talk for the ACES Conference wasn’t as far along as I wanted by the day I needed to leave. I would have to work on the airplane. That’s no hardship—I appreciate activities that distract me from the “Why aren’t we there yet?” feeling—but in my world, it is actively difficult to work without Internet access. On the way home, this article clamored for my attention—taking the entire day off would make for an even busier weekend.
In-flight Wi-Fi is expensive—it varies by flight but would have cost me $19—but then I remembered that T-Mobile provides free in-flight Wi-Fi as a benefit. A little research in the T-Mobile app on my iPhone confirmed that my Magenta plan provided either four total flights of Wi-Fi per year or an unlimited number of 1-hour-per-flight Wi-Fi sessions for streaming. I’m now down to two full-flight sessions.
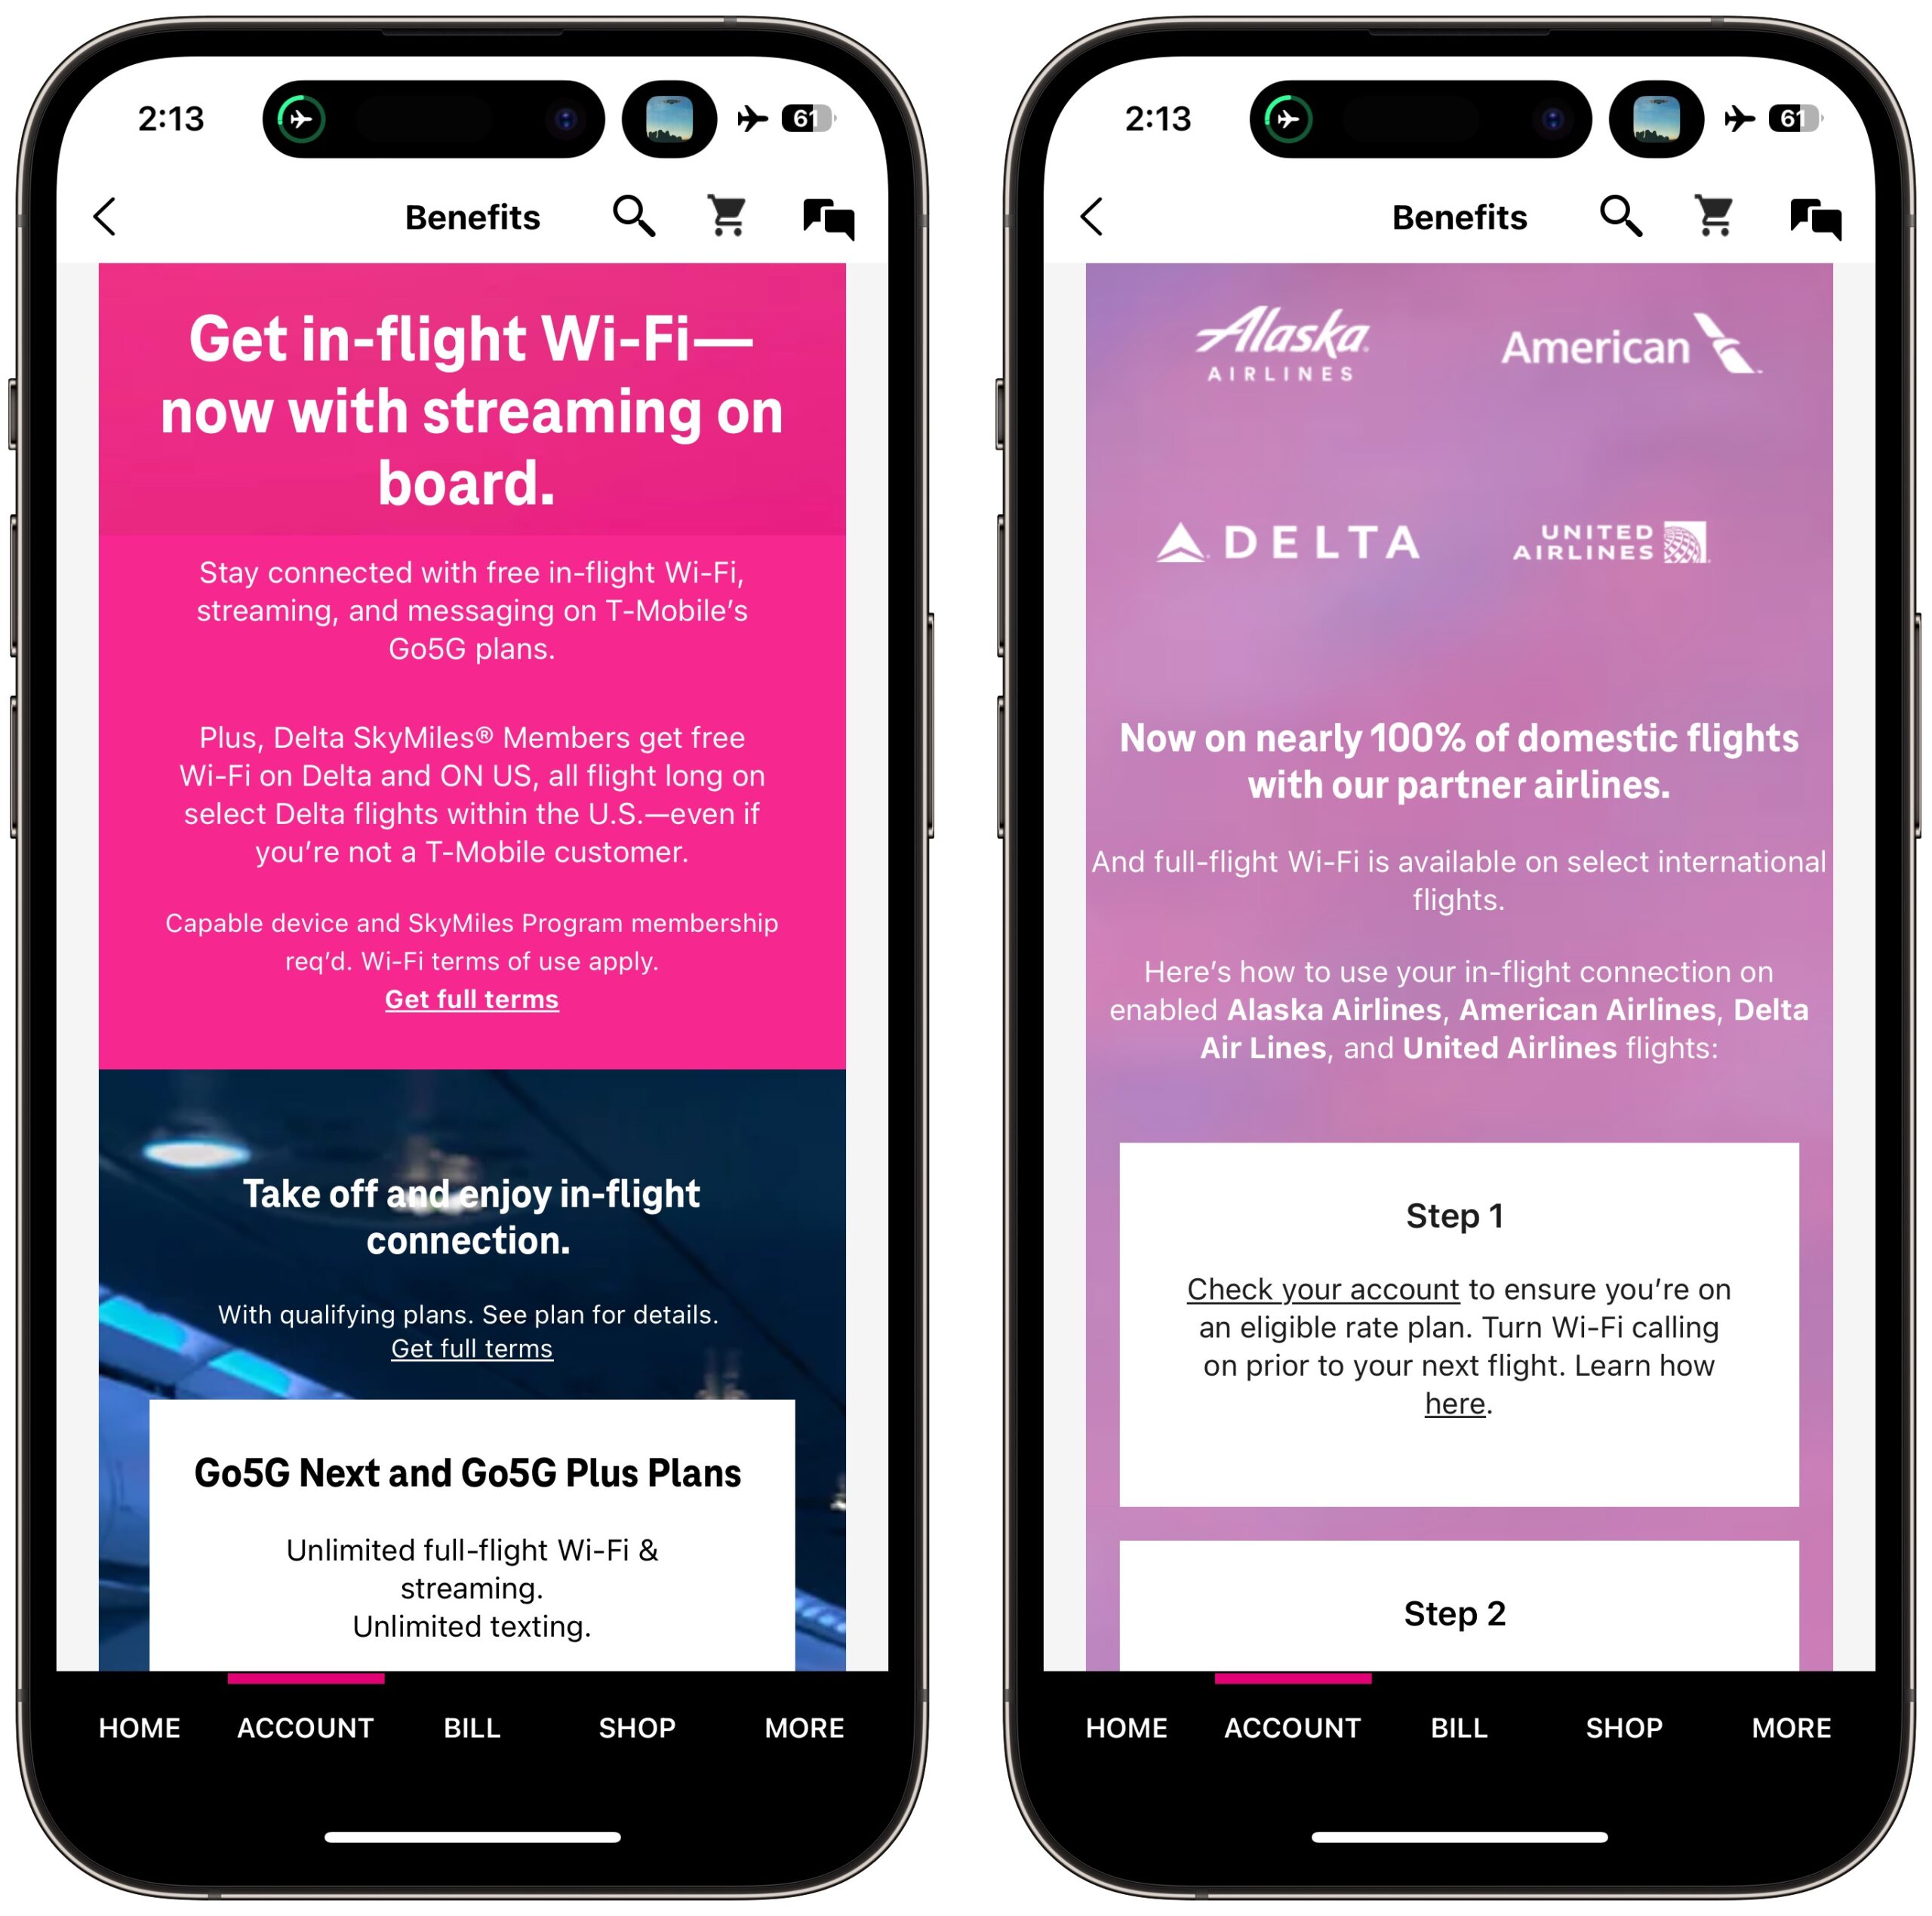
Enabling the T-Mobile free Wi-Fi was easy enough, if non-obvious. Once I activated Wi-Fi on my iPhone and was shown the American Airlines landing page, I had to scroll down to find a button that loaded another page. There, I had to switch to a Free Services tab, tap a T-Mobile button, and enter my phone number. Performance via the satellite Internet connection was decent, and I had no trouble loading websites, working in Google Docs, and more.
What I couldn’t do was get my MacBook Air fully online the entire time. Although the American Airlines landing page provided a button for transferring purchased access from another device, it asked for the email address used to purchase Internet access. It wouldn’t take my email address or phone number, and I couldn’t figure out any way to transfer my T-Mobile session. (On the second flight, where I cared more, I discovered there was an option to ignore an ad in exchange for 20 minutes of Wi-Fi connection time. I’m very good at ignoring ads.)
Not having my MacBook Air online much wasn’t the end of the world. I do all my writing in Google Docs and have the Google Docs Offlineextension in Arc, and since my documents were already open in Arc tabs, I had no trouble writing offline. I was even able to take the iPhone screenshots above and send them to the MacBook Air using AirDrop.
USB Type-A Isn’t Dead Yet
My current devices are an iPhone 15 Pro and an M1 MacBook Air, which sport only USB-C ports. I brought Apple’s two-port 35-watt USB-C charger and a pair of USB-C cables for the MacBook Air and the KU XIU X55 MagSafe charger I planned to use in the hotel to charge the iPhone, my Apple Watch Series 9, and my AirPods Pro (see “Going All in on MagSafe for the iPhone in the Office, Bedroom, and Car,” 6 May 2024). That all worked swimmingly—points for USB-C simplifying things.
But I hit my iPhone’s battery pretty hard on the longer flights between Chicago and Salt Lake City and wanted to charge using seatback power. Which had only USB Type-A jacks. Charging cables for which I hadn’t thought to bring. Luckily, it turned out that Past Adam had long ago packed a USB Type-A to USB-C cable in my dongle bag, and once I discovered that fact, I was able to charge my iPhone while working. I could also have charged directly from my MacBook Air, of course, and the planes also had standard power outlets, although they weren’t turned on until sometime in the middle of my first flight.
The moral of the story is to make sure you always pack a USB Type-A to USB-C cable. I was so caught up in thinking that I only had USB-C devices that I failed to remember the ubiquity of USB Type-A jacks. In a bit of serendipity, the conference sponsor swag included a braided charging cable with USB Type-A on one end and a hydra-headed other end that provides USB-C, USB Micro-B, and Lightning. That’s now living in my dongle bag.
TSA PreCheck
For my flight home, I ended up with an early afternoon boarding time, so I got to hang out with a friend from the conference at breakfast and on the way to the airport. We found the entrance to the security checkpoint, and my friend headed for the TSA PreCheck line. When I commented that I didn’t have TSA PreCheck, he gasped—it was as if I revealed I didn’t have indoor plumbing.
My excuse is that the last time I looked into TSA PreCheck, probably in 2019, it required signing up at a large airport. We may have indoor plumbing in most places in Ithaca, but we do not have large airports nearby, so I’ve been taking my shoes off—it’s amazing that we hicks even wear shoes, I know—every time I go through airport security. As we were having this conversation, three other conference attendees wandered up, and of course, they all had TSA PreCheck as well. I was clearly the rube.
But my friend let me in on a secret. Starting in 2018 and with increasing rollout through 2021, the office supply store Staples has provided the in-person side of TSA PreCheck signup. Who knew? And we have a Staples in Ithaca! Of course, when I checked the Staples website, I discovered that, presumably due to our lack of universal indoor plumbing, I would have to drive 30 miles to the Staples store in Elmira instead. The next closest option would be the Syracuse airport, which is twice as far away.
Now I have to decide if it’s worth doing TSA PreCheck or if we should figure out how to schedule a trip to a major airport to get Global Entry.
App Clips Live!
Unusually for me, I ended up with enough time at the airport to eat a sit-down lunch with two of my friends from the conference. The food at the Gourmandise Euro-Diner & Bakery was entirely edible and shockingly quick to arrive, but what surprised me was their payment approach. After our food came, the waitress printed out a QR code-emblazoned bill for each of us.
Scanning the QR code opened an App Clip, only the second time I’ve encountered one in the wild (see “Tech Notes from a Cross-Border Trip to Canada,” 13 June 2022). Whereas my previous App Clip was entirely unnecessary—I could have just paid for gas at the pump with Apple Pay—this one was a nice shortcut. In this case, I tapped the Open button, approved the Apple Pay process, and received a receipt. One of my friends stumbled over a request to sign up for an account (I already had a Toast account), but his payment went through anyway, and although he wasn’t sure if it had, when he tried again, the system helpfully informed him that the bill had already been paid.
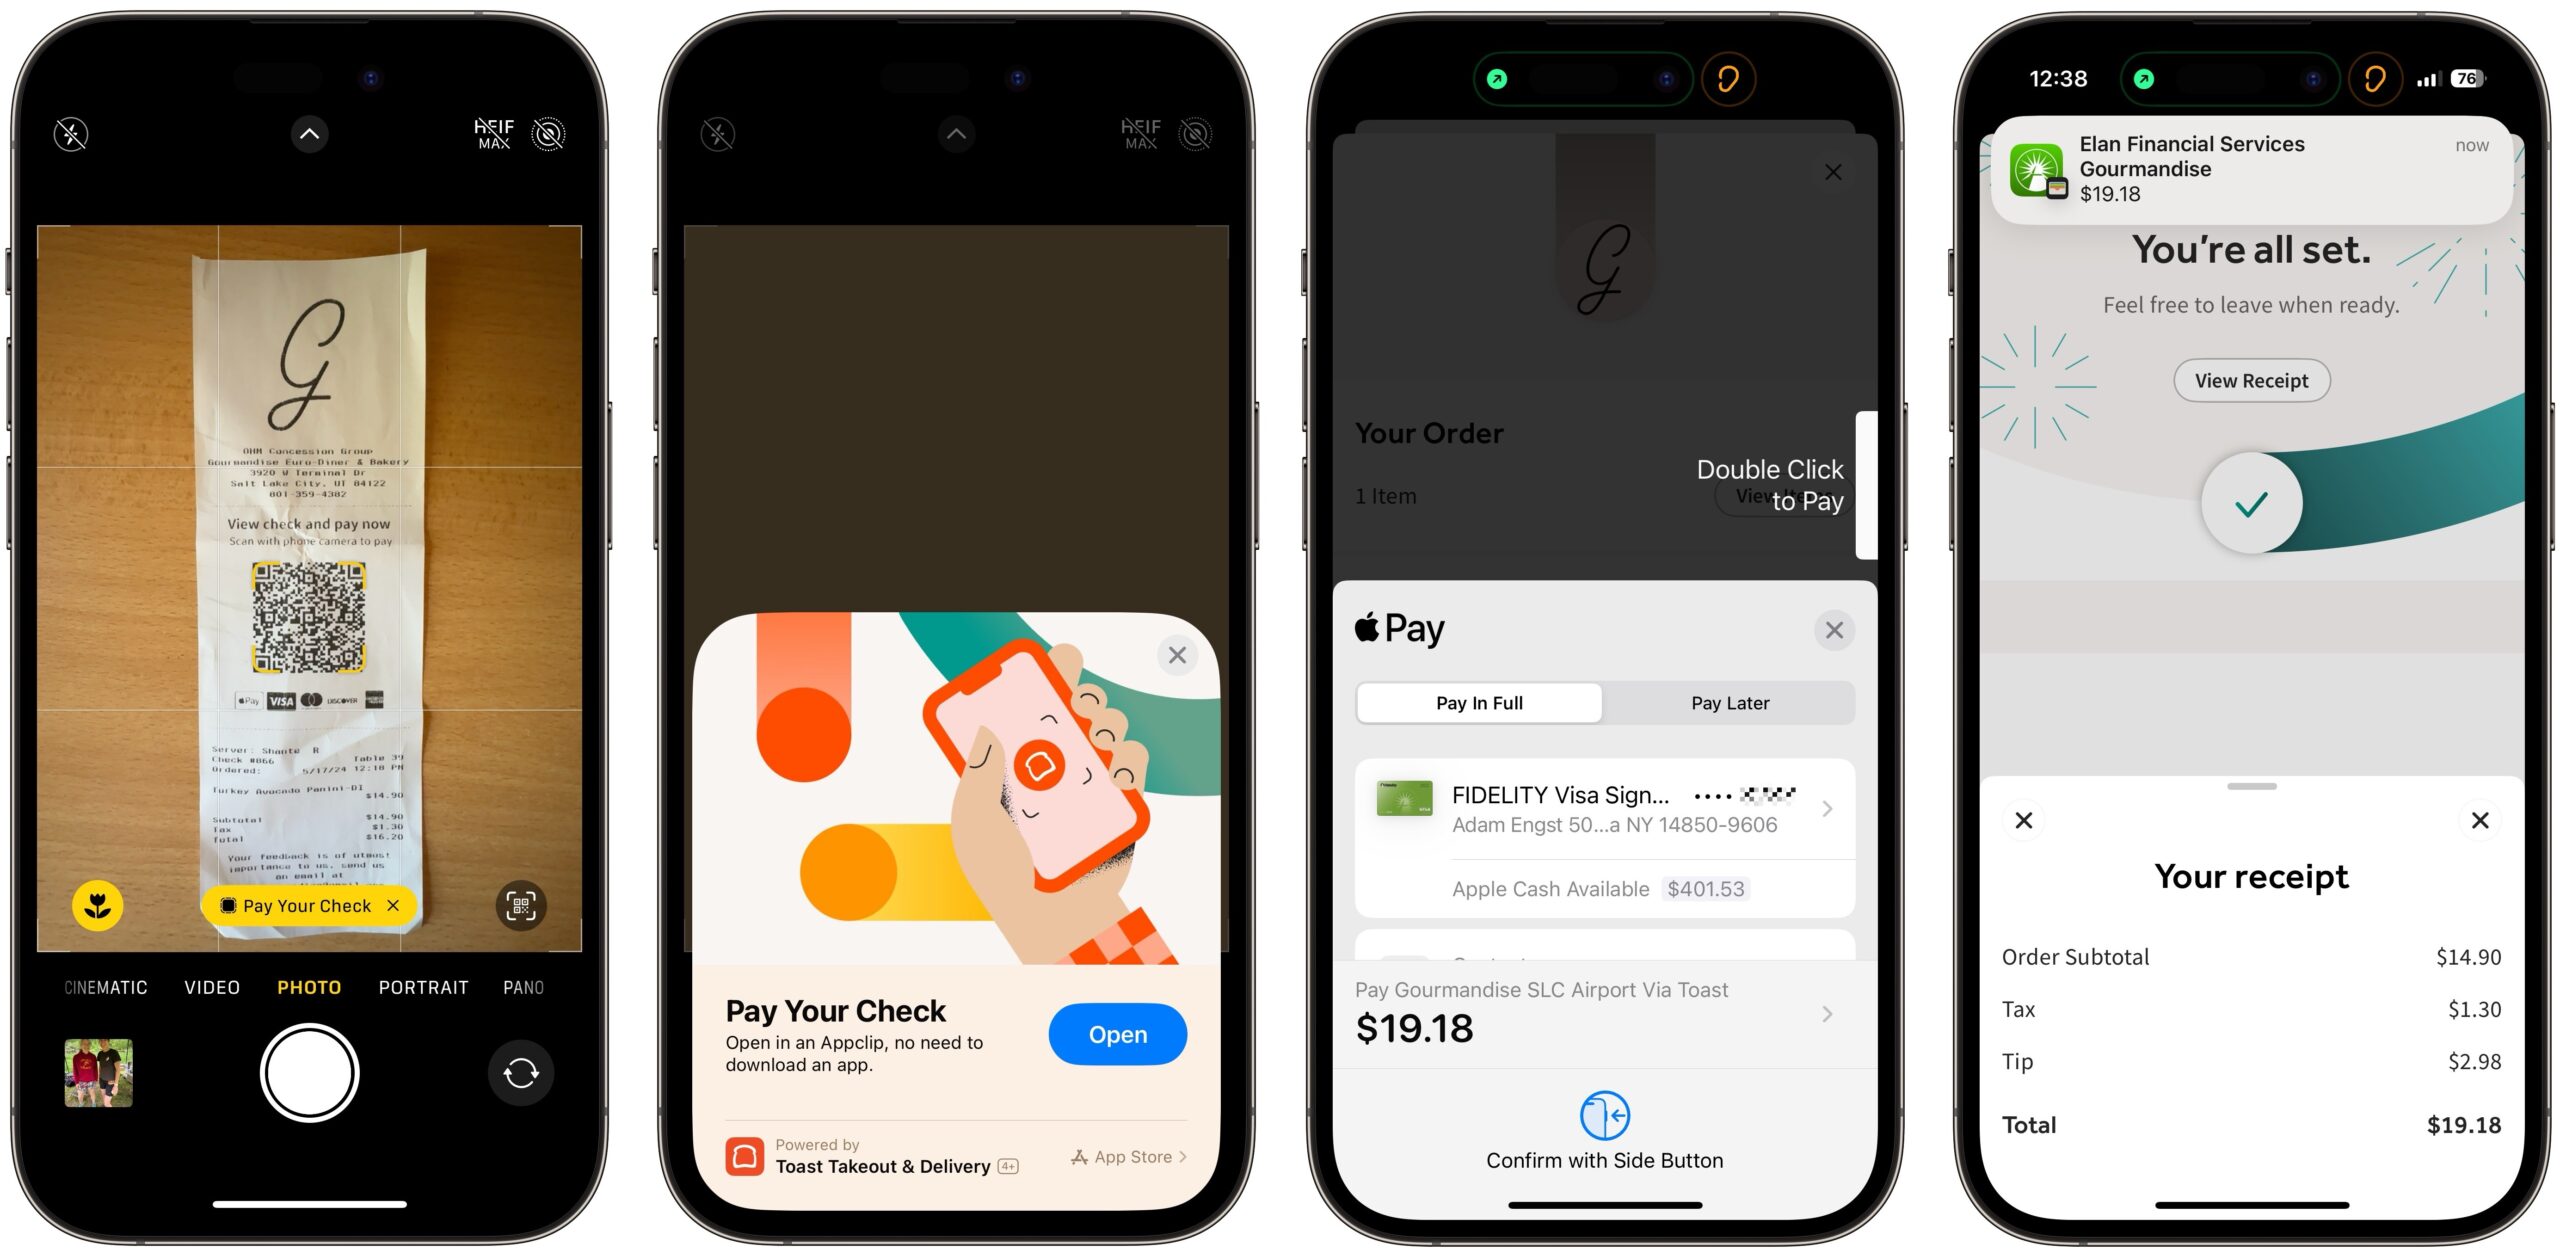
This use of the App Clip technology was effective thanks to the QR code, which provided an easy way to link my order to Apple Pay. The waitress could have used an NFC-capable terminal to accept digital payment for the meal, but that would have required her to interact with each of us, which would have been slower and kept her from other tasks. Instead, the QR code let each of us pay separately at our own pace. And I’m sure the system alerted her that we’d paid.
So that’s two App Clips in four years for me. How about you—have you seen an App Clip, and was it helpful?
Contents

Click for special offers to Mac Users Groups members.

Website design by Blue Heron Web Designs

Click the image for information about advertising on this website.