
MacTalk
March 2022

Protect Yourself from Blue Light with Digital Color Filters
Perhaps it’s a cliché, but I’ve made health the focus of this new year. I’m hitting the gym, tracking health with my Apple Watch, and experimenting with countering the effects of blue light exposure (for more on my health experiments, see “How I Finally Embraced the Apple Watch as a Fitness Tracker,” 7 February 2022).
The science isn’t settled, but there is a growing body of research that links blue light exposure from screens to sleep problems that may, in turn, contribute to cancer, diabetes, heart disease, and obesity. There’s a tinge of pseudoscience to some of the claims, but even Harvard Medical School points to these effects, recommending red lights and blue-light blockers at night, such as special glasses or screen filters.
Anecdotally, as someone who stares at screens all day and much of the night, I’ve been dealing with increasing eyestrain, dryness, and headaches as I get older. Apple has acknowledged this problem and provided a baked-in solution. Night Shift, introduced in iOS 9.3 and macOS 10.12.4 Sierra, gives you a free and easy way to experiment with blue light filtering. (Of course, if you need accurate color representation on your screen for graphics work, you won’t be able to use Night Shift.)
Reducing Blue Light on the Mac with Night Shift
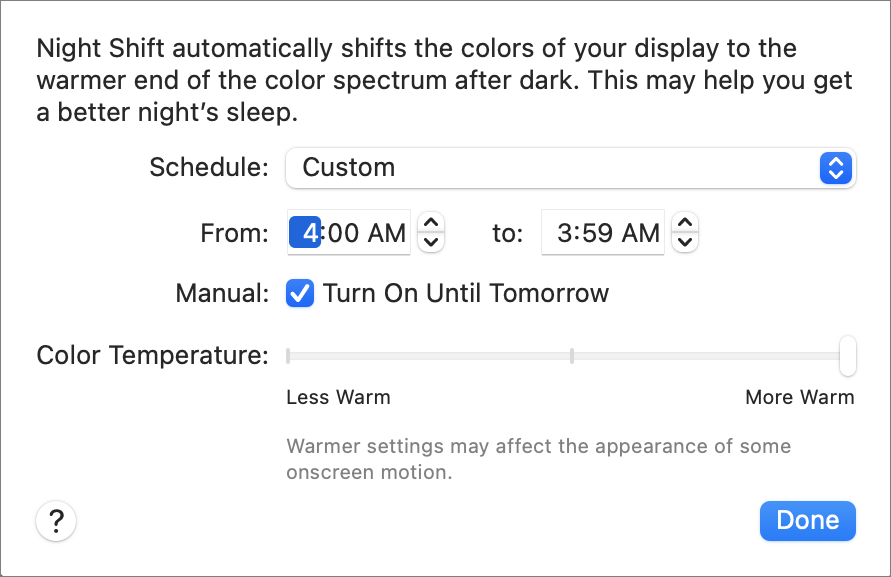
To try Night Shift on the Mac, go to System Preferences > Displays > Night Shift, and select Turn On Until Tomorrow. If you want to leave it on all the time, there’s a trick: for Schedule, choose Custom, and set the time from 4:00 AM to 3:59 AM. That way, there is only a brief minute during the wee hours in which Night Shift is off.
But Night Shift may not be all that effective. In a 2018 study, researchers at Rensselaer Polytechnic Institute had 12 young adults look at iPads between 11 PM and 1 AM. They tested four conditions across four nights: LED goggles that emitted a lot of blue light, Night Shift set to less warm, Night Shift set to more warm, and a dim light control with orange goggles. The researchers found that when Night Shift was enabled, the participants’ melatonin levels were slightly less suppressed, but there wasn’t a significant difference between settings. (Melatonin is a hormone that helps you sleep, and exposure to blue light suppresses it.)
But this was a small study, almost certainly conducted on college students whose sleep schedules and habits aren’t representative of older or younger people. And while Night Shift’s effects weren’t significant with respect to melatonin suppression, they did show a slight improvement. The researchers also noted that screen brightness was also a factor. All this got me thinking—what if Night Shift doesn’t block enough blue light?
With that last idea in mind, I looked for something stronger. Initially, I tried f.lux, the classic open-source app that Apple Sherlocked with Night Shift, but it’s tuned for gradual blue light reduction throughout the day. I wanted to eliminate blue light with the flick of a switch.
Eliminating Blue Light on the Mac
Night Shift reduces blue light but doesn’t eliminate it. To do that, you need a red filter, since red is the opposite of blue on the color wheel. Thankfully, the Mac has a built-in way to do that.
First, turn on Night Shift as described above, which removes some blue light but not all. We’re going to add a toggleable color filter on top of Night Shift to eliminate even more:
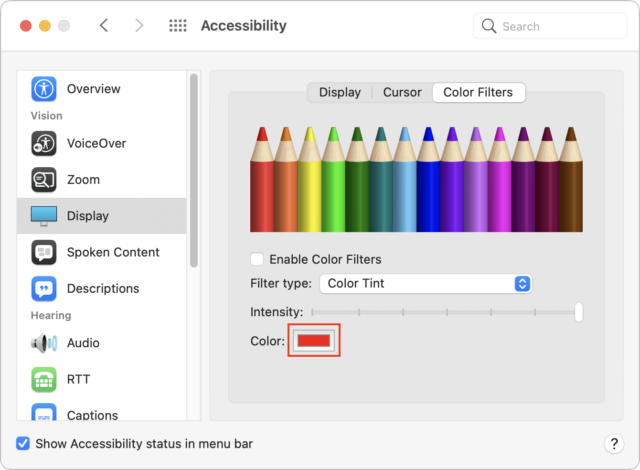
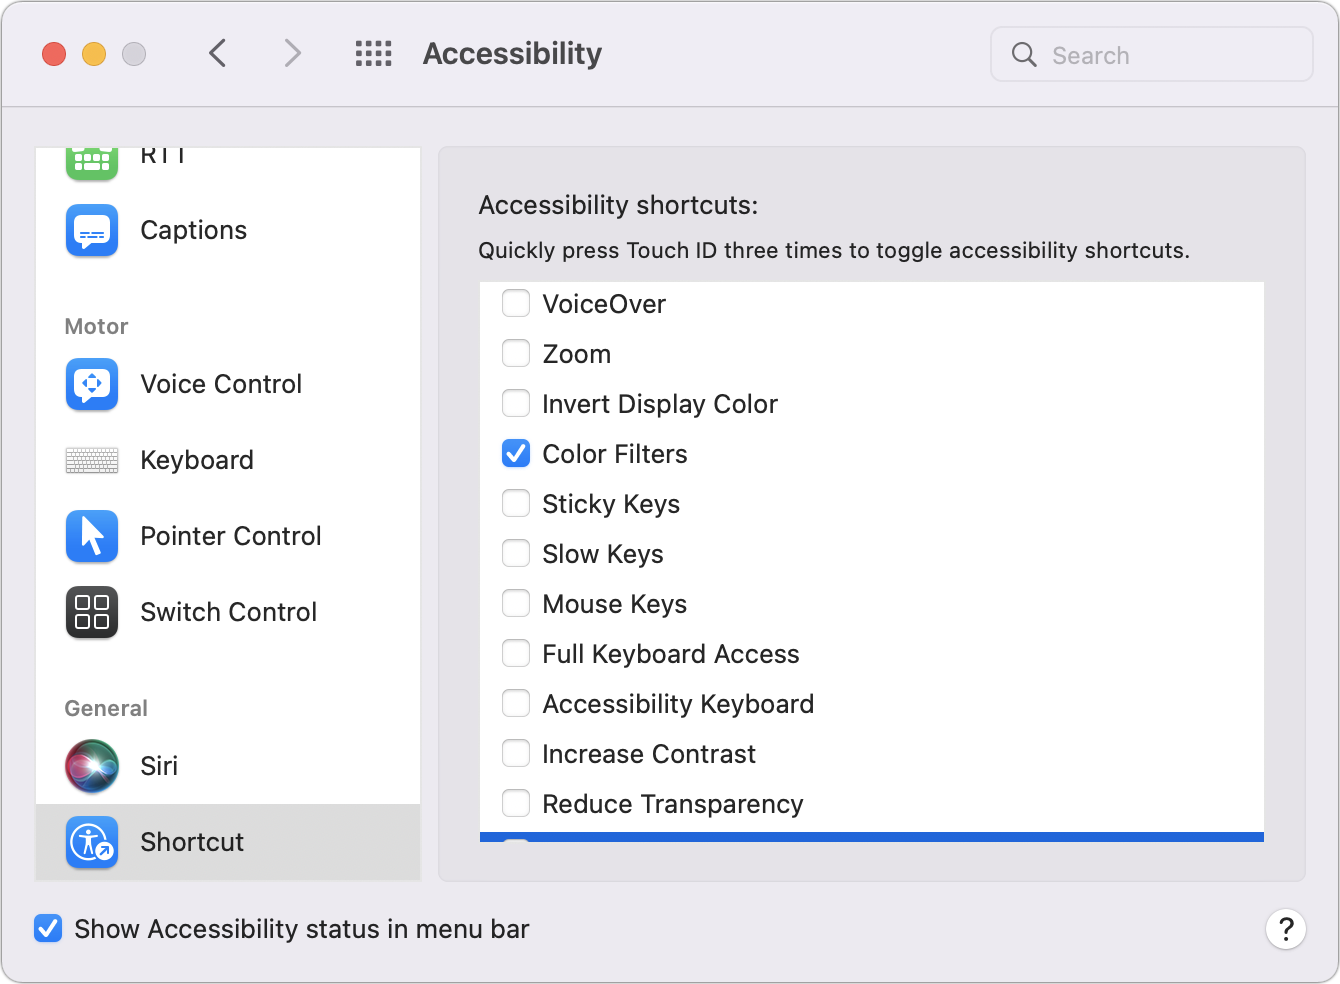
- Go to System Preferences > Accessibility > Display > Color Filters.
- For Filter Type, choose Color Tint.
- Move the Intensity slider all the way to the right.

Now we want to set the maximum shade of red:
- Click the box next to Color (highlighted above) to open the color picker.
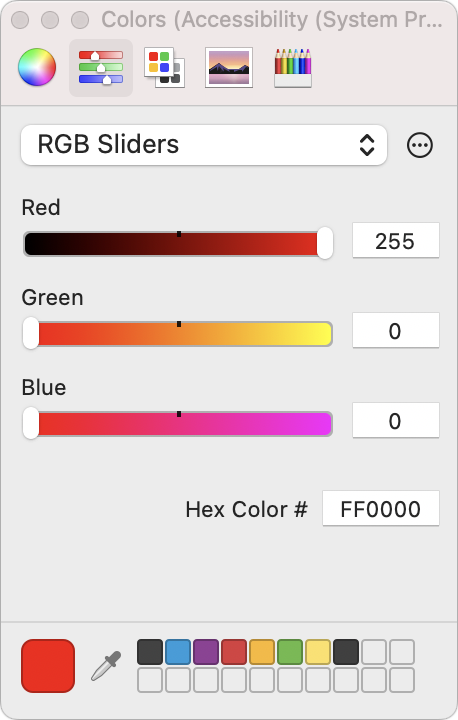
- Click the second icon in the toolbar and choose RGB Sliders from the pop-up menu. Turn red all the way up (255) and set both green and blue to zero.
That’s our initial setup. Now let’s make it easy to turn on and off:
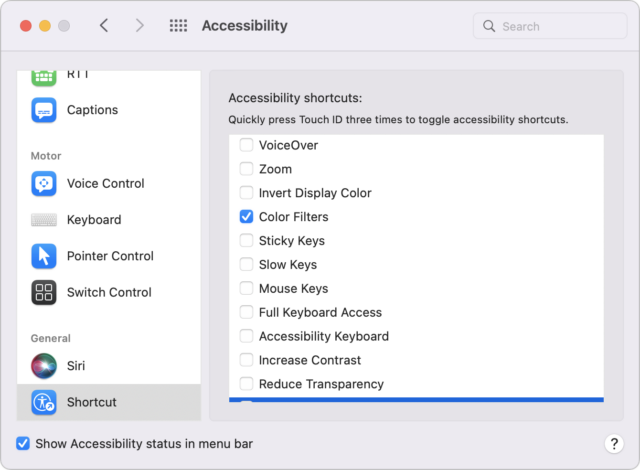
- While in the Accessibility preference pane, select Show Accessibility Status in Menu Bar at the bottom of the pane.
- Scroll all the way to the bottom of the sidebar and select Shortcut.
- Unless you need any of the other features listed, uncheck everything except Color Filters.
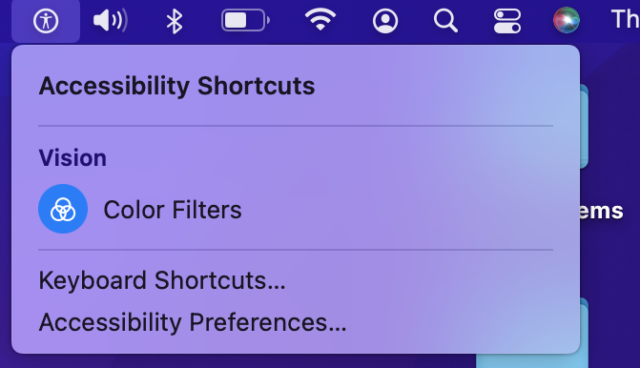
Now you have two ways to toggle the red color filter:
- Press Command-Option-F5 on your keyboard or press the Touch ID button three times. If you have more than one Accessibility shortcut enabled, it will present a (rather slow) menu that lets you turn accessibility features on and off. Otherwise, it instantly turns the screen red.
- Click the Accessibility icon in the menu bar (it looks like a little man in a wheel) and choose Color Filters.
As you can see in the photo below, this provides a rather shockingly red screen that’s appropriate for indicating your Evil Computer Hacker status or developing analog film in a darkroom.

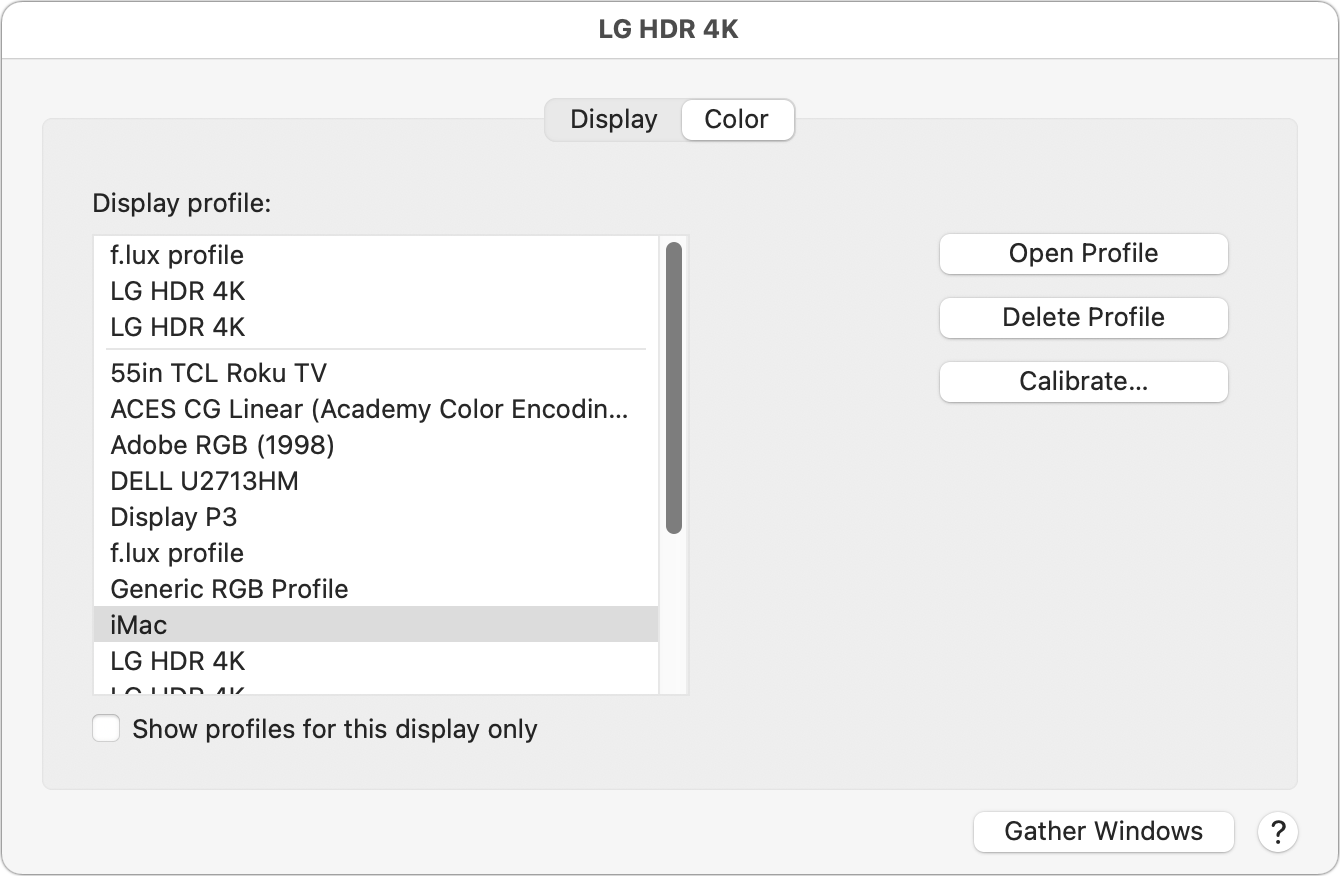
If the color filter doesn’t work on a second display, the likely culprit is a color profile. To fix that, open System Preferences > Displays. Make sure you’re looking at the display the color filter isn’t working on because macOS shows an individual settings panel for each display. Click Color, and then pick another profile like Generic RGB Profile. If you don’t see any that work, uncheck Show Profiles For This Display Only to show all available profiles.
Based on my testing, the problem seems to be that some color profiles simply won’t display certain colors. The LG monitor connected to my iMac won’t show pure red unless I set it to the same color profile as the iMac.
To make the most of this color filter, turn your screen brightness down to the lowest comfortable level since studies indicate that brightness is as disruptive to sleep as blue light.
Eliminating Blue Light in iOS and iPadOS
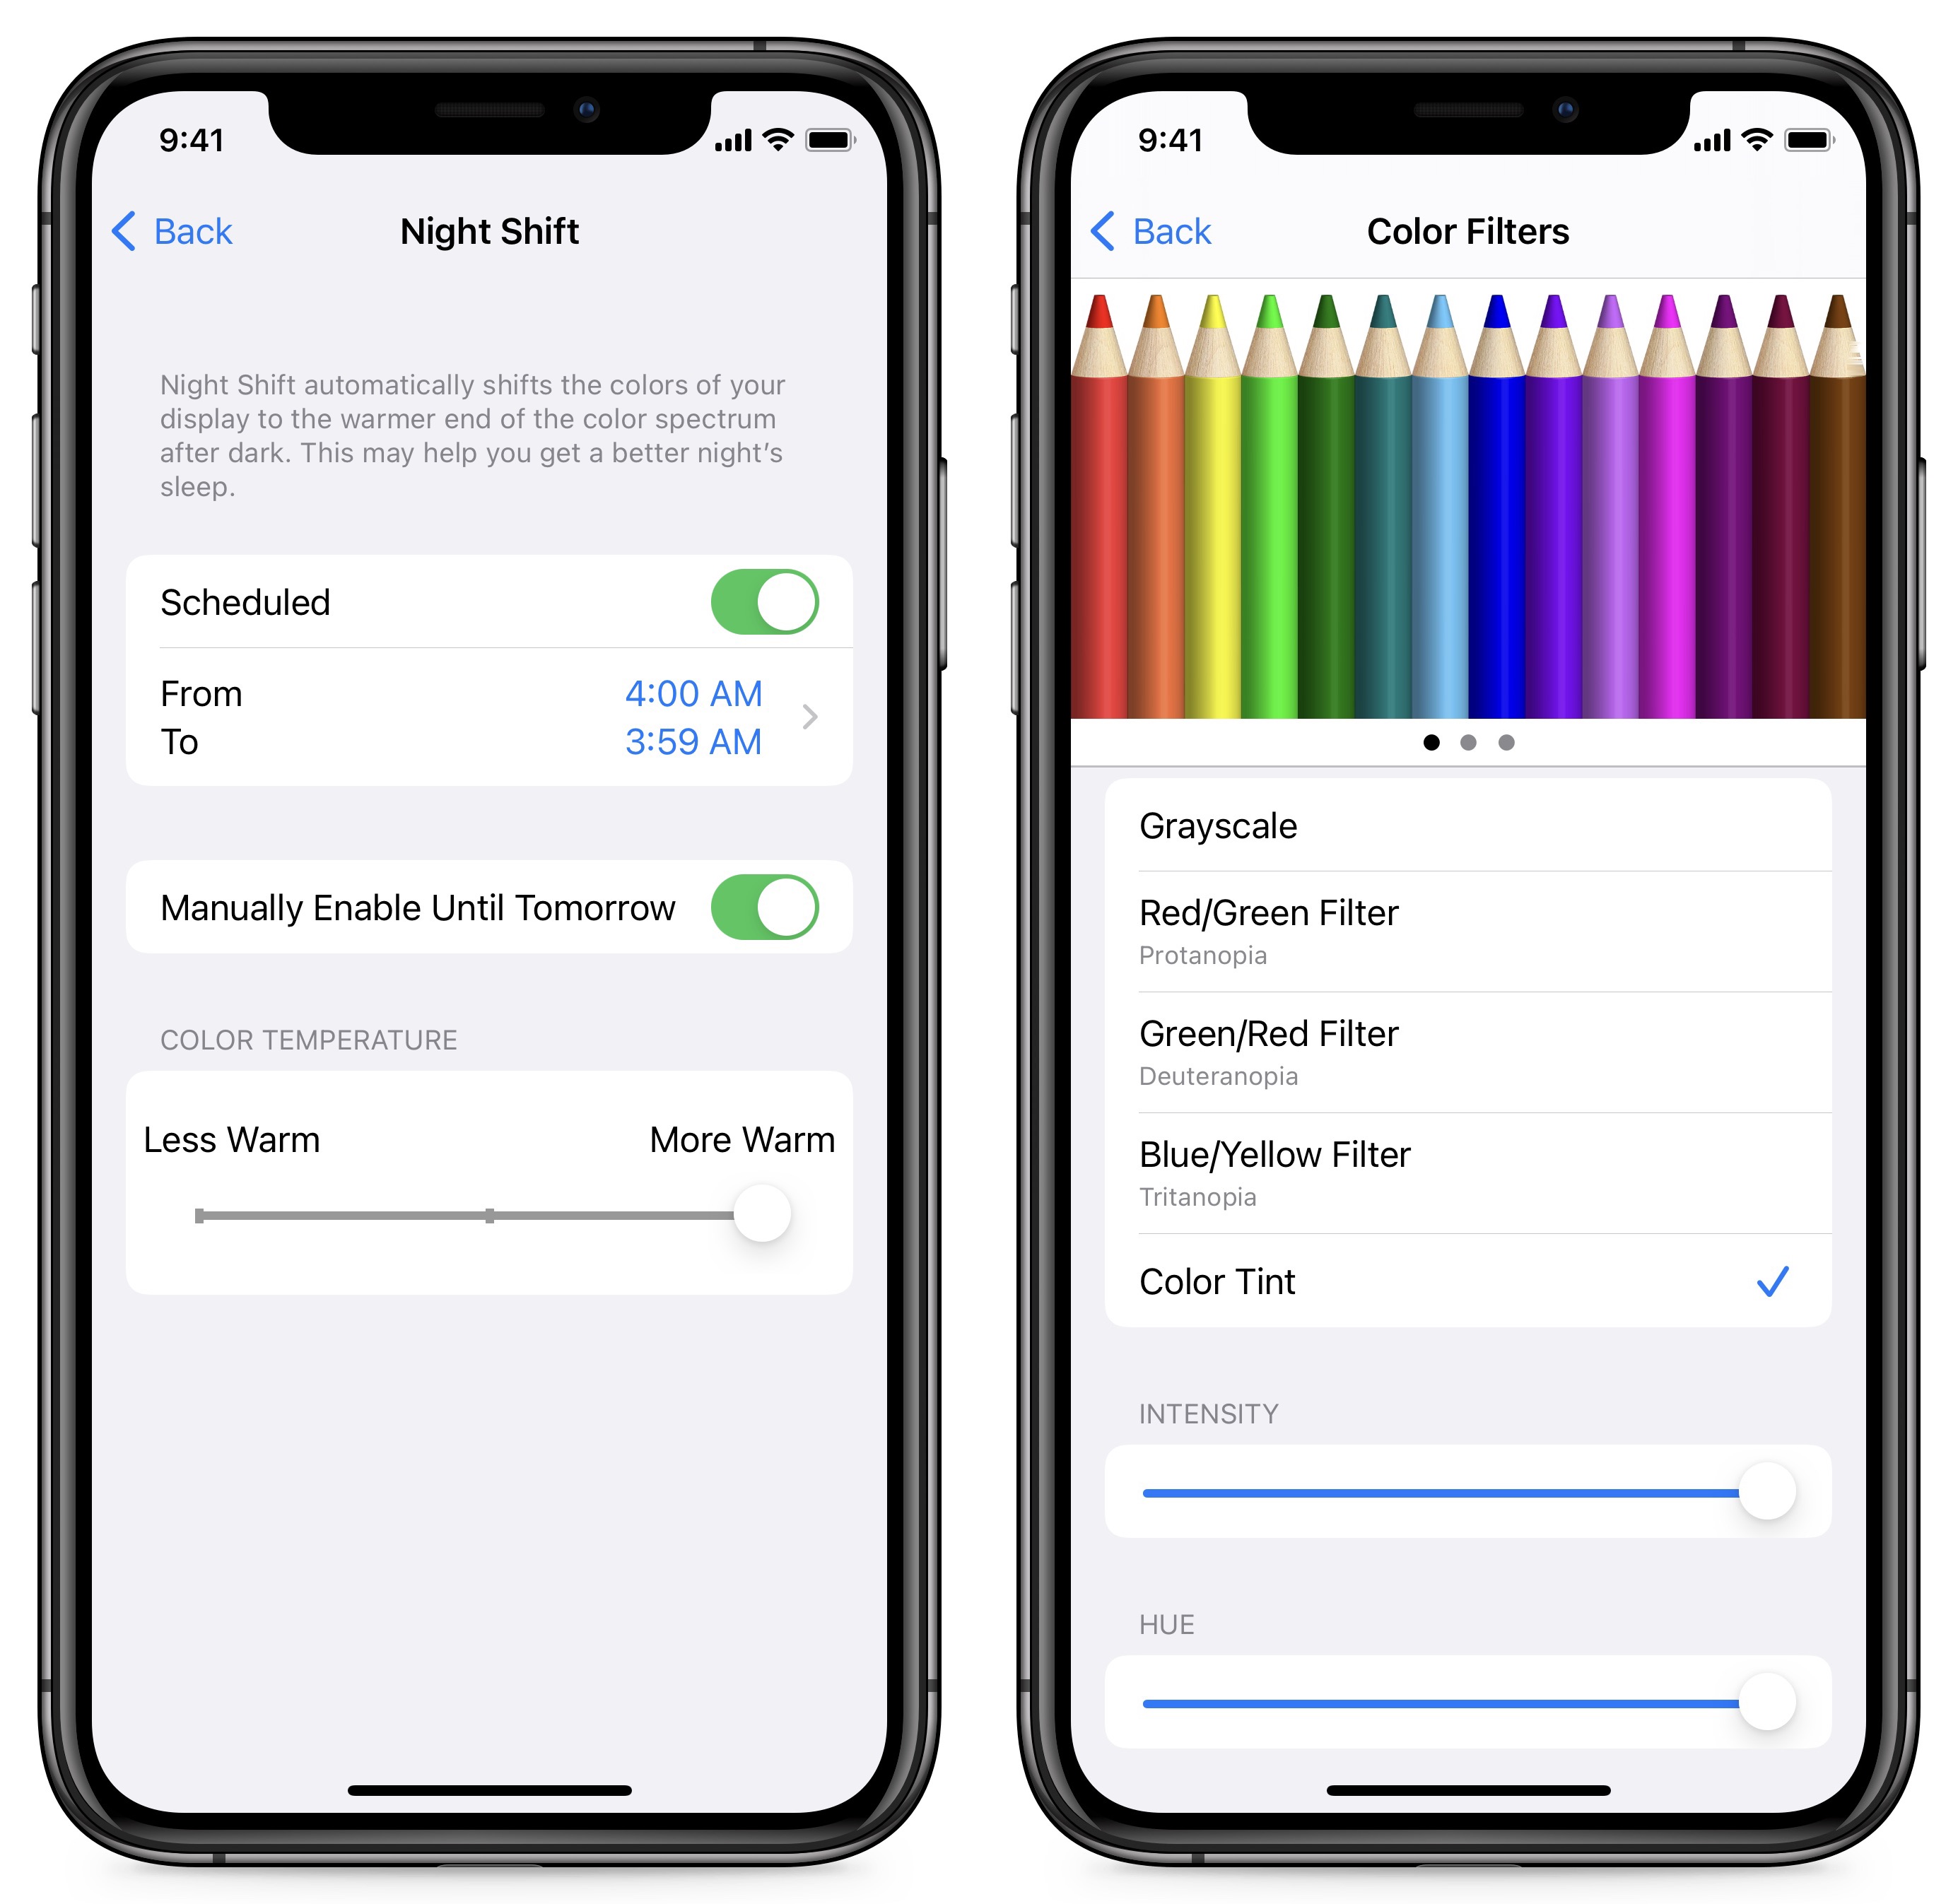
You can use the same techniques to set your iPhone or iPad to reduce and eliminate blue light. First, set up Night Shift to run 24 hours per day, minus one minute:
- Go to Settings > Display & Brightness.
- Tap Night Shift.
- Turn on Scheduled and set it from 4:00 AM to 3:59 AM.
- Drag the color temperature slider all the way to the right to More Warm.
Once again, to eliminate blue light, we’re going to take advantage of color filters:
- Go to Settings > Accessibility > Display & Text Size > Color Filters.
- Turn on Color Filters.
- Select Color Tint.
- Drag the Intensity and Hue sliders all the way to the right.

Your screen should be absolutely red, which isn’t always desirable. For instance, the podcast app Overcast, which has a largely orange color scheme, is practically unusable with the red color filter. However, it’s easy to make the filter togglable:
- Go to Settings > Accessibility > Accessibility Shortcut (at the bottom).
- Select Color Filters.
Now you can triple-press the side button or Home button (depending on your iPhone model) to turn the red color filter on and off.
What about brightness? Consider turning off Auto-Brightness while you’re in Settings > Accessibility > Display & Text Size and then manually adjust screen brightness to the lowest comfortable level using Control Center.
Blue Light Special vs. Red Light District
Let’s run an informal experiment. Try one of these approaches for turning your screen red while using your devices after dark. Then let me know in the comments if your eyes feel better or if you see improved sleep quality. Personally, I find the darkroom approach easier on my eyes, but I have yet to find a direct correlation to sleep quality. I’m much better off avoiding my iPhone entirely before bed and instead reading on my Kindle.
If you get tired of the red screen, simply disable the color filter settings outlined above.
Contents

Click for special offers to Mac Users Groups members.

Website design by Blue Heron Web Designs

Click the image for information about advertising on this website.